Tuesday, August 31, 2010

Sloppy Bombay Joes


Being the Food Network-aholic that I am, I was following this past season of The Next Food Network Star. It's your garden variety reality competition series, in which foodie finalists compete to win the grand prize of their very own cooking show. Said show is then aired on weekend mornings on the channel, and if their first, six-episode season turns out to be a success, then the winner continues their cooking show. It's a pretty cool concept, and I've enjoyed watching for 3 or 4 seasons now. I can't say, though, that I have ever been as excited to make the winner's food as I was to make Aarti's food.


Food blogger Aarti Sequeira took home the title this year, and her cooking show, Aarti Party, began two Sundays ago. In her show, she tries to take the mystery and challenge of cooking Indian food, and turn it into something accessible for the home viewer. She likes to put an Indian spin on ordinary American dishes, thus showing the home cook how to utilize Indian techniques and spices to turn the familiar into the exotic. It sounded like a great way to branch out and try new things. Plus, I thought Aarti was great when I watched her all season long. She has a very calm, soothing presence on camera, and she definitely seems knowledgeable and creative in her cooking.


The first main dish she made on her new show was this: Sloppy Bombay Joes. She turns the average, everyday sloppy joe into international cuisine by transforming the messy, tomato-ey sauce we're used to in this dish into an Indian-style sauce. I was intrigued, and the food looked delicious on the show.


As it turns out, I loved these sloppy joes! The flavors were at once familiar and unknown, as the Indian spices mingled with the traditional tomato sauce and the meat and veggies. Her addition of raisins and pistachios was, I thought, inspired. The idea of extra textures in my sloppy joe was a welcome one; it made the meat mixture more interesting and much more flavorful. I didn't know how I'd feel about all these components working together, but it was fantastic.

If I had any gripes about this dish, they'd be very trivial. I felt like the slop was almost too sloppy, if that's possible. I mean, just by looking at this recipe's title, you'd think I'd be prepared for a mess. But I think I made my sauce a tad too runny. I'm sure I could have simmered everything longer and thickened it up a bit more, but I guess I was just eager to eat! I just served the meat mixture up with a slotted spoon to drain some of the excess liquid, and it was fine. My buns began to fall apart while being eaten, but I can imagine that the joes could be served up in pita bread or even tortillas, and still taste great.

Now that I've tasted her food, I can't wait to see what else Aarti's got in store for us. I'm sure this was just the first of many of her creations that I'll be trying out!


Sloppy Bombay Joes
adapted from Aarti Sequeira's recipe, found on Food Network.com
makes 4 to 6 servings


Ingredients
For the sauce:
2 Tbsp. vegetable oil
1 Tbsp. fresh ginger, minced
2 cloves garlic, minced
1/2 serrano chile, seeded and finely minced (save the other half for the turkey)
1 tsp. garam masala
1/2 tsp. paprika
1 (15-ounce) can tomato sauce
1 cup water

For the turkey:
3 to 4 Tbsp. vegetable oil
1/4 cup shelled pistachios (about a small handful)
1/4 cup raisins (about a small handful)
1 tsp. cumin seeds (I had to use ground cumin; I had no seeds)
1/2 white onion, finely diced
1 red bell pepper, seeded and finely diced
1/2 serrano chile, seeds intact (not chopped)
Kosher salt
1 lb. ground turkey
1/2 tsp. honey
1/4 cup half-and-half (I used 1% milk)
Small handful cilantro, chopped (soft stems included)
4 to 6 hamburger buns

Directions
1. Begin by making the sauce: Warm the oil in a medium saucepan over medium heat, until it shimmers. Add the ginger, garlic, and serrano pepper. Saute until the ginger and garlic brown a little. Add the garam masala and paprika and saute for 30 seconds. Stir in the tomato sauce and water. Bring to a boil, then reduce the heat and simmer, uncovered, until thickened, about 15 minutes.

2. Begin the turkey: In a large skillet, warm 2 Tbsp. of oil. When shimmering, add the pistachios and raisins. Cook until the raisins swell up and the pistachios toast slightly. Remove from the pan and set aside.

3. Return the pan to medium heat, add 1 to 2 more Tbsp. of oil, and warm until shimmering. Add the cumin seeds and allow them to sizzle for about 10 seconds, or until some of the sizzling subsides. Stir in the onions and bell pepper; saute until softened (since I had ground cumin, I just threw the cumin in with the onions and peppers). Add the serrano pepper. Saute for another couple of minutes, seasoning with the salt. Stir in the turkey, breaking up the big lumps. Cook until opaque, about 5 minutes.

4. Meanwhile, your sauce should be ready. Pour the sauce into the skillet with the turkey. Stir and bring to a boil, then lower the heat and simmer until the mixture has thickened slightly, about 10 minutes.

5. Once the turkey has cooked and the sauce has thickened a little, remove the serrano pepper. Add the honey, half-and-half, pistachios, and raisins. Stir through and taste for seasoning. Before serving, garnish with fresh cilantro (I stirred my cilantro in at the end).

6. Toast the buns, fill with the turkey mixture, and serve. Eat (with your hands!) and enjoy!

Monday, August 30, 2010

Oatmeal Zucchini Muffins


So there is a blogging group out there called Tuesdays with Dorie. Once a week, the group makes a selection from Dorie Greenspan's cookbook Baking: From My Home to Yours. Even though I don't belong to the group, there are plenty of blogs I read whose authors do bake along with it. Each Tuesday, I get to drool over the week's selection, looking at beautiful pictures of the baked goods and envying the treats and goodies of others. The truth is, if I did belong to TWD, it would probably cause me to gain 50 pounds. It's hard enough for me to find ways to pawn off the baked goods I already make, and if I had a new one each and every Tuesday, I'm afraid I'd find myself eating most of it myself!


Anyway, I digress. What I am trying to tell you is that after all this time, with me following along with the TWD bakers, I finally decided to make one of the recipes! I kept seeing variations on Dorie Greenspan's Oatmeal Breakfast Bread, which the group made two weeks ago. It looked like a great, healthy way to feed my kids some breakfast, and it sounded like something I would love, too.

The recipe was chosen by Natalie of Oven Love, and she decided to turn her bread into muffins. I thought this would be the way to go, so I made muffins, too. I liked Natalie's idea of substituting a half-cup of the flour in the recipe for whole-wheat. I did that, too. I used dried cranberries in my variation, because the recipe allows you to use pretty much any dried fruit you like. Then, I made the riskiest recipe change of all: I added zucchini.


When I saw the recipe on other bloggers' sites, I had visions of zucchini floating in my head. I had two big, beautiful zucchini (is it zucchini or zucchinis? I don't know!) sitting on my windowsill, and my head always turns to baked goods immediately when I think of how to use ingredients. There are other things I made with the zucchini (which I'll be blogging about soon), but I really wanted to try some in this recipe first. So I did!


The other fun spin I put on these muffins was the pan I used to bake a few of them. I had just purchased a Whoopie Pie Pan from Williams-Sonoma, and I was really excited to take it out for a test drive. I thought, if it'll work for whoopie pies (you know, those fun little sandwich cookies you make by putting a fluffy filling in between two cake-like cookies), it should work for muffins, too. I thought it would be cute to make little muffin tops; they'd be a great size for my younger son, and I'd get to practice using the new pan. That picture above features the cooled muffin tops; I thought they turned out great! Below are the full-size muffins, which I made 16 of.

I'm really glad I thought to use the zucchini in these, because it worked flawlessly. The flavors are similar to those you find in zucchini bread, or even carrot cake, which I always think of as a close cousin to zucchini bread. I really enjoyed the cranberries in there, too. It gave a nice, tart burst to the muffins, which was a nice counterpoint to all the sweetness.


So, even though I am not a part of Tuesdays with Dorie, I am happy to have finally tried out one of Dorie's recipes. I'm definitely interested in trying out some more of her stuff; maybe I can find one of her books at the library or something! Thank you, Natalie, for posting the recipe and for providing me with inspiration and ideas on how to make these muffins so good. Below, I have provided the recipe as I made it, along with a link to Natalie's post about the bread (muffins).


Oatmeal Zucchini Muffins
adapted from Dorie Greenspan's Oatmeal Breakfast Bread
makes about 20 muffins (I made 16 muffins and 8 muffin tops)

Ingredients
For the topping:
1/2 cup light brown sugar, packed
1/2 cup walnuts, chopped
1 tsp. ground cinnamon

For the muffins:
2 large eggs
3/4 cup unsweetened applesauce
1/3 cup flavorless oil, such as canola or safflower
1/4 cup whole milk
3/4 cup all-purpose flour
1/2 cup whole-wheat flour
3/4 cup sugar
1 1/2 tsp. baking powder
1 tsp. ground cinnamon
1/2 tsp. baking soda
1/2 tsp. salt
1/4 tsp. freshly grated nutmeg
Pinch of ground cloves
1/3 cup dried, sweetened cranberries (Craisins)
1 cup oats (old-fashioned or quick oats, I used a bit of each)
2 cups lightly packed, finely grated zucchini, squeezed to release excess liquid

Directions
1. Place rack in the center of the oven; preheat to 350 degrees. Spray your muffin tins (or whoopie pie pan!) with nonstick cooking spray.

2. In a small bowl, use your fingers to toss together the sugar, nuts, and cinnamon until evenly mixed. Set aside to use as your topping.

3. In a medium bowl, whisk together the eggs, applesauce, oil, and milk until well blended.

4. In a large bowl, whisk together the flour, sugar, baking powder, cinnamon, baking soda, salt, nutmeg, and cloves. Remove 1/2 tsp. of the mix and toss it with the cranberries, just to coat; set aside. Stir the oats into the large bowl. Pour the liquid ingredients over the dry and, using a large rubber spatula, stir just until everything is evenly moistened. Do not overmix. Stir in the zucchini, then scatter the cranberries over the batter and stir to blend.

5. Divide the batter evenly among your muffin tins or whoopie pie pans, if using. Evenly sprinkle the topping mixture over each muffin, pressing gently so the topping sticks.

6. Bake for 20-24 minutes, or until the tops are lightly browned and a toothpick inserted into the center of a muffin comes out clean (the muffin tops take about 12-16 minutes). Transfer the tins to a rack to cool for about 10 minutes, then remove the muffins from the tins. Continue to cool the muffins on the racks. Serve at room temperature. The muffins will keep well in an airtight container for 3-4 days.

Thursday, August 26, 2010

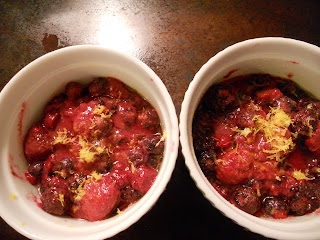
CEIMB: Individual Mixed Berry Cobblers


This week's Craving Ellie in My Belly recipe was a little something different for us. Typically this summer, the recipes we've been making for the group have been savory meals. We've had some truly fantastic dishes, as a result. But now it was time for a fantastic dessert!


This week it was Pamela of Cookies with Boys' turn to choose, and she decided to go for Mixed Berry Cobbler, from Ellie's So Easy book. Since I knew that the original recipe was going to make much more cobbler than we could handle, I decided it would be fun to use my adorable little ramekins again and make mini, individual mixed berry cobblers. Plus, I had just enough of an open, frozen bag of mixed berries hanging around to make two ramekins' worth. Score!


However, since I was cutting the recipe down to a third the amount, I had to do some fancy estimating to cut all the ingredients back. It was proving difficult, for example, to cut 1/4 cup flour down to a third of that amount. I tried my best to be accurate, but I had my doubts as to whether or not the biscuit topping would work out well.


I'll be curious to see how the other CEIMBers' biscuit topping looked, since mine appeared a bit too thin before I baked it. I was still worried while it was in the oven and I kept checking on it, assuming (correctly) that my little single servings would not take nearly as long to bake as Ellie's 8x8 baking dish would. I took them out after about 22 minutes, and they looked great! The fruit mixture was thick and bubbly, and the biscuit had browned very nicely and definitely had not melted or disintegrated into the fruit, as I had feared it would. In place of regular granulated sugar, I had sprinkled some turbinado sugar (sugar in the raw) on mine, and it gave the tops of the cobblers a nice, golden shimmer.


This cobbler was a dream to make, in terms of difficulty level. For a seemingly complex dessert, it took nearly no time at all to put together. The hardest part, for me, was just cutting everything down to one-third. If I'd made the 8x8 dish, this would have been even more painless!


Since the hubs loves desserts that include fruit, I had a feeling he'd love this, and he did. I'm much less of a fruit-in-my-dessert fan, but I'm super happy with the way these turned out. Ellie's done it again!


Thanks, Pamela! It was nice to make an after-dinner treat for a change. To see how the other members of the group fared, you can check out the blogroll, here. Ellie's Mixed Berry Cobbler can be found on Food Network's website, here.

Tuesday, August 24, 2010

Pancakes Two Ways


I love pancakes and I'm always trying to find new and exciting ways to make them. Recently, I decided to make not one, but two new recipes when I made breakfast for dinner. Breakfast for dinner is probably one of my favorite meals! It doesn't even matter what the breakfast is, so long as it is served at dinnertime.

Anyway, I wanted to make green tea pancakes with the brand-new container of matcha powder that I bought not too long ago. I had worked with matcha powder years ago, when I was an employee of Starbucks. It's basically very finely ground Japanese green tea, and it contains a lot of antioxidants, vitamins, and minerals for a powerfully healthy kick. In addition, it imparts such a lovely green shade to anything you add it to (as I'm sure you can tell from my pictures).


Now that I had my first type of pancake, I had to come up with one more. I figured my children weren't going to eat the green tea pancakes, and I was right. So what would I make for them that would be a big winner?

Cinnamon pancakes, that's what! My kids are gigantic cinnamon fans. I mean, just enormous. I'm almost inclined to start sprinkling cinnamon on their veggies, just to see if they'll be more enthusiastic about eating them! Not a bad idea....


So I had my two ideas, and I was ready to start mixing up ingredients. I was fortunate enough to find two successful recipes on other blogs. The green tea pancakes came from justJENNrecipes, and the cinnamon pancakes were found on Sugarlaws. Go check both of them out if you get the chance; both are great!

I didn't want to become too experimental my first time making either, so I stuck pretty close to the original recipes. However, in an attempt to give mine a bit more fiber, I added a bit of wheat bran to each batter. The kids didn't seem to notice, and I thought it gave the pancakes a nice little extra something, an added texture that would otherwise not have been there. I also studded some of them with slivered almonds. I sprinkled a few on the pancakes just before flipping them to their second side. Xander wanted almond faces, but I just wasn't that talented this time. Instead, my almonds are a bit more free-form. Next time, perhaps!


As expected, my kids did love the cinnamon variation. They are especially good with a bit of cinnamon sugar sprinkled on top, along with the maple syrup. It's almost like dessert.

And the green tea pancakes were a hit as well! When Andy first saw them, he thought I had simply put green food coloring in them, so he was intrigued when he found out that the color came from matcha powder. The green tea flavor is present, but not at all overwhelming. It gave the pancakes a bit of earthiness, mixed with a mild grassy-ness that was subtly sweet. It's hard to describe, but suffice it to say, they were pretty awesome. I think I'd like to make some matcha cookies or a matcha cake for my next green tea endeavor. I just love the taste!


Green Tea Pancakes
adapted from justJennrecipes
makes about 6 large pancakes

Ingredients (Note: I cut the original recipe in half. Also, this includes the variations I made.)

3/4 cup all-purpose flour

1/4 cup wheat bran

1/2 Tbsp. baking powder

1 Tbsp. sugar

1 tsp. matcha powder (powdered green tea)

1 egg

3/4 cup milk

1/2 Tbsp. Smart Balance 50/50 Blend, melted

slivered almonds, for sprinkling (optional)


Directions

1. In a large bowl, whisk together the flour, wheat bran, baking powder, sugar, and matcha. Add the egg, milk, and butter blend just until combined.

2. Heat a skillet or griddle to medium or medium-low. Grease the pan (or use nonstick cooking spray). Using a 1/4-cup measure, drop scoops of batter onto your pan. Wait until bubbles begin to form and just start popping on the pancake's surface, then add a few slivered almonds to the top, if desired. Flip pancakes, then cook an additional 2-3 minutes on the other side.

3. Remove pancakes to a plate, then serve with whatever pancake toppings you like.


Cinnamon Pancakes

adapted from Sugarlaws

makes about 6 large pancakes


Ingredients (Note: this version includes my own variations.)

1 cup whole milk

3/4 cup plus 2 Tbsp. all-purpose flour

1/4 cup wheat bran

2 tsp. baking powder

1/4 tsp. salt

2 tsp. ground cinnamon

2 Tbsp. sugar

1 egg

1 Tbsp. Smart Balance 50/50 Blend, melted

slivered almonds, for sprinkling (optional)


Directions
1. Combine all the ingredients except the almonds in a mixing bowl. Whisk until smooth.

2. Heat a skillet or griddle to medium or medium-low. Grease pan (or use nonstick cooking spray). Using a 1/4-cup measure, drop scoops of batter onto your pan. Wait until bubbles start to form and just start popping on the pancake's surface, then add a few slivered almonds to the top, if desired. Flip pancakes, then cook an additional 2-3 minutes on the other side.

3. Remove pancakes to a plate, then serve with whatever pancake toppings you like.

Sunday, August 22, 2010

Bacon-Wrapped Jalapeno Bites


Just three ingredients. It's unbelievable, but that's all it takes to make one of the most sinfully delicious appetizers I've ever had. Where have these things been all my life? I am in love. Such simplicity, yet such huge, wonderful flavor. Allow me to explain.


We've been blessed with a huge amount of homegrown jalapeno peppers this summer. Andy's parents have grown them, and we pretty much get to enjoy all of them, since we're the only people on his side of the family who eat jalapenos. Some of them were harvested last weekend, and we wound up bringing about 50 of these babies home. Naturally, I thought of jalapeno poppers right away. I mean, how else was I going to use up so many of these lovelies at once? I'd never made jalapeno poppers before, but I sure wanted to try.


Then I remembered that I had seen a killer recipe on The Pioneer Woman website. I figured since she had come through for me last time I tried her dishes, I couldn't lose with these. In her version of jalapeno bites, bacon, cream cheese, and jalapeno peppers are the only components. That's it. All you have to do is halve the peppers, scoop out the seeds and membranes, then fill each half with a nice spoonful of cream cheese. Take your piece of bacon, wrap it around the pepper half, then secure with a toothpick. Arrange the peppers on a cooling rack that is sitting on a baking sheet lined with foil (to catch the bacon drippings), then bake! When they are done, you can remove them to a paper towel-lined plate to absorb some of the grease.

And then you're in for a treat. These are so tasty, so addictive, that you find yourself making a batch of them, with the intention of having some left over for another evening. Instead, you find that they all disappear quickly, leaving you wishing you had made more. Many, many more. Suddenly, the 50 jalapenos seem like, well, not enough. That's okay, though. There'll be other opportunities to make these puppies. Not that I need a good excuse to make them. "I need food" will suffice.


Here's the recipe. A quick note, though, before you proceed: I did change things up just a little. Below, I listed what I did. You can refer to the Pioneer Woman's website to see exactly what she did, but it's not that different. In an attempt to make these things just a tad healthier (which seems pointless, given the short, but greasy, ingredients list), I used low-fat cream cheese. I also sliced my bacon into fourths, while the original recipe has you slicing them into thirds. I thought I could get away with using marginally less bacon per pepper, and I was right. I would never have known the difference! Finally, I baked my poppers at a slightly higher temperature, and they were perfect after 20 minutes.


Bacon-Wrapped Jalapeno Thingies
adapted from The Pioneer Woman's recipe
makes 32 jalapeno thingies

Ingredients
16 jalapeno peppers
1 (8-ounce) package cream cheese, softened (I used 1/3 less fat)
8 slices bacon (original recipe used a whole pound)

Directions
1. Use latex gloves, if you have some on hand, to cut each jalapeno pepper in half. Using a small spoon, scoop out the seeds and white membranes from inside each half.

2. Smear 1/2 Tbsp. cream cheese inside each jalapeno half. Slice each piece of bacon into fourths, then wrap one bacon fourth around each jalapeno half; secure with a toothpick.

3. Arrange the jalapeno halves on a cooling rack, then place the rack on a foil-lined baking sheet. Bake the peppers at 400 degrees F for 20 minutes. Remove peppers to a paper towel-lined plate to cool.

Saturday, August 21, 2010

Scooby-Doo, and a Recipe Too!


Okay, first of all, I should apologize for the lighting in these photos. Boy, it really makes everything look unnaturally bright and washed out. These pictures were taken late at night before my son's 5th birthday, and I found that the cake looked even worse in the morning light the next day. Go figure! So I'm presenting you with the lesser of two evils.


This cake was the capper on a week of Scooby-Doo treats that I had prepared for his special day. There were the cookies, then there were the cupcakes. He wanted everything to be Scooby-themed; even most of his gifts this year were Scooby-related. This cake was the piece de resistance, the crowning touch to end the festivities.


We were fortunate enough to find this cake pan at a Michael's store about 5 months ago. I made Xander promise me that he would not change his mind about wanting a Scooby-themed birthday party this year, and he kept his word. Hard to believe, but he is still just as much in love with Scooby now as he was 5 months ago! Anyway, we grabbed the cake pan that day at Michael's because they don't usually carry it, and it was on clearance. I've never seen another one since, so I'm glad to have found it.


This was hard, intricate work, let me tell ya. I've done a pirate ship-shaped cake before, so I was familiar with this style of decorating. This was much more difficult, though. It required you to first frost the sides and background sections with plain white frosting. Then, you had to trace Scooby's entire outline in black frosting. Andy helped me do Scooby's nose and mouth, while I worked on his tongue and eyes. Next, you could fill in the brown fur sections and his dog tag and collar. Finally, I did Scooby's hamburger, and then I outlined the entire cake with a bunch of orange stars (Xander's favorite color is orange, and I thought it went just fine with the rest of the cake).


I used a new cake recipe for this one, and I was really happy with it. It comes from a cookbook I've come to really enjoy lately, The Craft of Baking. It's for a basic yellow layer cake with a milk chocolate buttercream, but obviously I went in a different direction with my frosting. This cake almost reminds me of sponge cake; by folding egg whites into the batter before baking, you produce a light, airy cake that holds together incredibly well, and is tender and moist at the same time. Best of all, it is not too sweet, so the buttercream I used paired well with the cake.

In case you're wondering about the frosting, it's actually the Wilton recipe for buttercream. It's sinful, I know, because it contains some shortening. I justified this by reasoning that since I was using up all the Crisco I had in the house (which I had bought when I took Wilton's cake decorating classes), and because it was a special occasion, it'd be okay. And it does work very well for this type of decorating project. To make the brown for Scooby's fur (I think I made it a bit too dark) and the black for his outline, I added some cocoa powder to some of the frosting, then added a bit of water to thin it out. Then I just tinted the rest of my white frosting with various shades of gel-paste food coloring.

I'm including the recipes for the yellow cake and the Wilton frosting below. I would love to try this cake next time with the frosting in the cookbook, though. I have no doubt it would be sublime. Until then, here you go!


Yellow Layer Cake

from The Craft of Baking

makes one 10-inch layer cake (or one Scooby-Doo cake plus about 4 cupcakes!)

Ingredients

2 Tbsp. unbleached all-purpose flour

12 Tbsp. (1 1/2 sticks) unsalted butter, very soft, plus extra for the pans

1 3/4 cups sugar

1 1/2 tsp. pure vanilla extract

7 large egg yolks

3 cups cake flour

1 tsp. kosher salt

3/4 tsp. baking powder

3/4 tsp. baking soda

1 cup plus 2 Tbsp. sour cream

7 large egg whites


Directions

1. Butter the bottoms and sides of three 8-inch cake pans and line the bottoms of the pans with rounds of parchment paper. Butter the tops of the paper liners, and then dust the pans with the all-purpose flour, tapping off any excess. Preheat the oven to 350 degrees F.

2. In the bowl of an electric mixer fitted with the paddle attachment, mix the butter, 1 1/2 cups of the sugar, and vanilla extract on medium speed, scraping down the sides of the bowl several times, until pale and fluffy, 5 minutes. Add the egg yolks, one at a time, letting each become incorporated into the batter before adding the next.

3. In a separate bowl, sift together the cake flour, salt, baking powder, and baking soda. Reduce the mixer speed to low and alternate adding the flour mixture and the sour cream to the butter mixture, adding one third of each at a time and letting them fully mix in before adding the next. When all of the flour mixture and sour cream have been added, turn the mixer to medium-high speed and mix for about 2 minutes, to fully incorporate the ingredients and help build the structure.

4. Scrape the batter into a large mixing bowl. Clean the bowl to the mixer well and, using the whisk attachment, whip the egg whites on low speed until frothy, about 5 minutes. (Instead of doing this, I just used a hand mixer and whipped the egg whites in a smaller bowl, then proceeded with the recipe.) Add the remaining 1/4 cup sugar and increase speed to medium high. Whip whites to soft peaks, then fold them into the batter in 3 additions.

5. Divide the batter between the three prepared cake pans and spread it out evenly with a spatula. Place pans on two baking sheets. Bake the cakes, rotating the pans and switching the cakes between the upper and lower racks of the oven halfway through, until they are lightly golden on top, gently bounce back when touched, and a cake tester inserted in the center of the cake comes out clean, 30 to 35 minutes. (Mine obviously took about 15 to 20 minutes longer, due to the size of the Scooby pan.)

6. Transfer the cake pans to a wire rack and let the cakes cool for 30 minutes. Then remove them from the pans and let them cool completely, at least 3 hours, before frosting.


Buttercream Icing

from Wilton

makes about 3 cups


Ingredients

1/2 cup solid vegetable shortening

1/2 cup (1 stick) butter or margarine, softened

1 tsp. clear vanilla extract

1 Tbsp. meringue powder

4 cups sifted confectioners' sugar (about 1 lb.)

2 Tbsp. milk

3 Tbsp. cocoa powder

1-2 Tbsp. water

Gel-paste food coloring


Directions

1. In large bowl, cream shortening and butter with an electric mixer. Add vanilla, then the meringue powder. Gradually add sugar, one cup at a time, beating well on medium speed. Scrape sides and bottom of bowl often. When all sugar has been mixed in, icing will appear dry. Add milk and beat on medium speed until light and fluffy. Keep bowl covered with a damp cloth until ready to use.

2. For best results, keep icing bowl in refrigerator when not in use. Refrigerated in an airtight container, this icing can be stored 2 weeks. Rewhip before using.

3. For chocolate buttercream, proceed through the confectioners' sugar addition, then add cocoa powder. Add water gradually, a bit at a time, then the milk, until the desired consistency is achieved. Add more or less than the recipe calls for, depending on how thick/thin you'd like your icing to be.

Thursday, August 19, 2010

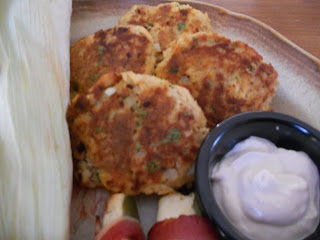
100th Post! CEIMB: Salmon Cakes with Ginger-Sesame Sauce


I really cannot believe that I have hit 100 posts! It just doesn't seem possible, and yet here I am. I wish I had something incredibly elaborate or fancy to present to you for the occasion, but alas it is time for another good old Craving Ellie in My Belly! I also wish I could say that I made something I really loved for this occasion, but I actually didn't even eat this week's pick. It's all good, though. The hubby really enjoyed it!


When I first discovered that this week's choice was Salmon Cakes with a Ginger-Sesame Sauce, I knew I probably was not going to be eating it. I'm sorry, I just can't do salmon. Not to mention my extreme dislike of both yogurt and mayonnaise (the two primary ingredients in the dipping sauce). Yeah, it just was not going to be in the cards for me. Originally I just wanted to do an Ellie rewind recipe; you know, try out something the group made way before I joined. But then the hubs found out that the recipe was salmon. After a bit of persuading, I agreed to make the cakes for him after all. I made a third of the full recipe, and got four patties.


I would love to be able to tell you that I was very brave and tried the salmon cakes, but I'd be lying. I know they're probably great, but I just could not get past the smell of the canned salmon. After inhaling those fumes while preparing this, I just couldn't eat them. I don't know; I'm sure I'm just strange, and that I'm going to read the other CEIMBers' blogs and find out that these were a rousing success. And they were a success, at least for my husband. He said they were delicious. He especially liked the sauce. I had to make it with sour cream instead of yogurt, since that is what I had on hand. I was afraid that may have been the wrong thing to do, but apparently not since he loved it!


Thank you, Sarah of Sarah's Kitchen Adventures, for a pick that was a definite hit with my hubby. I'm sorry I didn't eat it myself, but know that it was loved! I served it with some roasted corn on the cob and some bacon-wrapped jalapeno poppers (recipe coming soon). This recipe can be found here, on Food Network's website. I'm anxious to see what everyone else thought of this one!

Tuesday, August 17, 2010

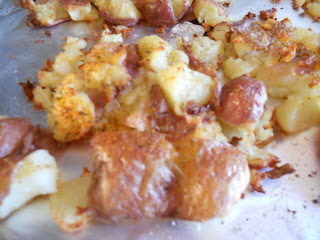
Comfort Meatballs with Crash Hot Potatoes (from the Pioneer Woman)


Wow. I can't believe I waited so long to make these recipes. I mean, they've both been on my radar for a while now. The Comfort Meatballs are one of the many, many dishes I've been dying to try out of Ree Drummond's cookbook, The Pioneer Woman Cooks. I've had that book for nearly a year now, and I realize it's been terribly underused. I say that because this is the first thing I've made out of it, and it was to die for. As for the Crash Hot Potatoes? Also to die for. Crisp on the outside and perfect and tender on the inside, these fluffy taters are truly unique and delicious.


The meatballs begin with just a basic, standard meat and oats mixture. Add some milk, minced onion, salt, and pepper, mix, and shape into meatballs. Allow them to set up in the fridge for a bit.


Then, you brown the meatballs on the stove and pour a sauce all over them. The sauce is also made up of very basic ingredients. It contains some ketchup, some Worcestershire, a bit of Tabasco, some vinegar, sugar, and minced onion. Once those ingredients mix, however, they become magical. Really. I can't explain it, except to say that I don't even like ketchup by itself, and I could have eaten this sauce straight, with a spoon. I mean, it's just yummy.

So then you bake the meatballs with the sauce poured all over. They become baked through, and the sauce becomes gooey and bubby and perfectly wonderful. I'm sure these meatballs would have been even more decadent if I'd made them with ground beef, but they were fabulous with ground turkey.


Now, as if that weren't enough wonderful-ness for one meal, you get these potatoes on the side! Man, were these good! I couldn't stop picking at them while I was getting the rest of the meal together. They're so easy to do, too. There's just no reason for me not to make these at least weekly. Or more than weekly. In fact, I'd like to make them right now...

All you need to do is boil some small potatoes until fork-tender, then place them on a baking sheet. Next, you get to squash them with a potato masher! It was very fun, especially for my 5 year-old son. You just squash them once in one direction, then turn the masher 90 degrees and squash again in the opposite direction. This makes them all textured, and sorta flat. I compared them to home fries after making them. But tastier. Much, much tastier.

After you've "crashed" all the taters, you can season them with salt and pepper, as well as any herbs you may have lying around. I didn't use any herbs this time, but I didn't miss them. These were sublime with just good ol' s&p. Finally, make sure they have enough olive oil on them that they will not burn, and then bake them. That's it. Easy to make, and great for aggression if you're in the mood to squish something! I highly recommend making this meal next time you're in the mood for meat and potatoes. It just doesn't get much better than this!


Comfort Meatballs
from The Pioneer Woman Cooks
makes 6 to 8 servings


Ingredients
For the meatballs
1 1/2 lbs. ground beef (I used turkey)
3/4 cup quick oats
1 cup milk
3 Tbsp. very finely minced onion
1 1/2 tsp. salt
Freshly ground black pepper
4 Tbsp. canola oil
1/2 cup flour

For the sauce
1 cup ketchup
2 Tbsp. sugar
3 Tbsp. distilled white vinegar
2 Tbsp. Worcestershire sauce
4 to 6 Tbsp. minced onion
Dash of Tabasco


Directions
1. In a bowl, combine the ground beef and oats. Pour in the milk, then add the diced onion and salt. Add the black pepper, then stir to combine.

2. Roll the mixture into tablespoon-sized balls and refrigerate them for 30 to 45 minutes to firm. Preheat the oven to 350 degrees F. Heat the canola oil in a large skillet over medium heat. Dredge the meatballs in the flour.

3. Brown the meatballs in batches until light brown. As they brown, place them into a rectangular baking dish.

4. Stir together the sauce ingredients and drizzle the sauce evenly on the meatballs. Bake for about 45 minutes or until bubbly and hot.


Crash Hot Potatoes
from the Pioneer Woman's website
makes about 6 servings


Ingredients
12 whole new potatoes (or other small round potatoes)
3 Tbsp. olive oil
kosher salt to taste
black pepper to taste
Rosemary (or other herbs of choice) to taste (I did not have rosemary)


Directions
1. Bring a pot of salted water to a boil. Add in as many potatoes as you wish to make and cook them until they are fork-tender.

2. On a sheet pan, generously drizzle olive oil. Place tender potatoes on the cookie sheet, leaving plenty of room between each potato. With a potato masher, gently press down each potato until it slightly mashes. Rotate the masher 90 degrees and mash again. Brush the tops of each crushed potato generously with olive oil.

3. Sprinkle potatoes with kosher salt, fresh ground black pepper, and fresh chopped rosemary (or chives or thyme or whatever herb you have available). Bake in a 450 degree oven for 20 to 25 minutes, until golden brown.

Sunday, August 15, 2010

MSC: Triple Citrus Cupcakes


Wow, two cupcake posts in one week! The other day I shared my Scooby-Doo Yellow Buttermilk Cupcakes, and today I give you these Triple Citrus Cupcakes. They sounded like they would be light, summery, and refreshing! They were chosen by Marthe of Culinairy Delights for the Martha Stewart Cupcakes Club, and I was really looking forward to trying them.


Well, unfortunately, these fell a little bit short of my expectations for them. I know that sometimes Martha's cupcake recipes have a reputation for being a bit dry, or dense, or too muffin-like, and I felt like that was the case with these particular cupcakes. They almost reminded me of cornbread in texture, and although cornbread can be delicious, it doesn't necessarily scream light and fluffy.


They're pretty easy to make, though! That fun picture of my stand mixer you saw earlier was all the beautiful, colorful citrus zest that went in with the butter and sugar. It smelled absolutely amazing! I did think 4 sticks of butter in one cupcake recipe was a tad ridiculous, but I went with it.

After the zest mixes in with the butter/sugar mixture, you add vanilla, then 9 (yes, 9!) eggs. Then the flour and salt goes in, and that's it for the batter. While I was making these, I found it odd that there was no baking soda or baking powder in the recipe. Again, I went with it. I figured Martha knew what she was doing.


The cupcakes were heavy, indeed, but the flavor was very nice. I loved the delicate citrus flavor throughout, and I could envision these being eaten without glaze for breakfast. With the glaze, though, they did become much more dessert-y. It's just a simple powdered sugar/citrus juice glaze, with a bit of zest sprinkled in. My cupcakes seemed to absorb some of the glaze; it didn't sit all nice and thick on top of the cupcake like the one in the picture in the cookbook did.

I have to say, though, that my review of these cupcakes was just my opinion. Andy took these in to work, and they were very well-received there. People really loved them; I even heard they were hiding them from other people in the building! So it just goes to show you, it's all a matter of taste. Do check out what the other Martha bloggers thought of these, over at the MSCC blogroll! You can also find the full recipe here, on Martha's website.


Friday, August 13, 2010

Yellow Buttermilk Cupcakes with Fluffy Vanilla Frosting


Well, the Scooby-Doo theme continues! The other day I posted about my Scooby-Doo Dog Tag Sugar Cookies, and now I'm going to tell you about my Scooby-Doo Cupcakes! For my son's 5th birthday party at a local children's bouncey house, I decided to go with cupcakes because they're easy, they're kid-friendly, and it would give me an excuse to once again whip out my trusty Martha Stewart's Cupcakes book!


I knew the birthday boy would want cupcakes that were as plain and simple as could be. Therefore, this was the perfect opportunity to finally try out Martha's Yellow Buttermilk Cupcakes with Fluffy Vanilla Frosting. My son's kinda strange, for a 5 year-old. He does not like chocolate cake, only vanilla. He absolutely hates frosting; I had to serve him a plain, "naked" cupcake with no frosting on top. And I wouldn't even dream of offering him ice cream with his cake; he won't even touch the stuff. I thought I'd be safe with the yellow cupcakes, and I could give the vanilla frosting to his party guests, but not to him.


I was lucky enough to find these adorable Scooby-Doo cupcake papers on Ebay, and I originally contemplated frosting each cupcake with two different-colored frostings at once. However, that made me nervous because I've never done something like that before. I decided I didn't want to risk there being a cupcake disaster the morning of the party! So in the end I kept it simple and did half the cupcakes bright orange (Xander's favorite color) and half the cupakes teal. The colors were great, really vivid, and I thought they represented the colors on Scooby and the gang's Mystery Machine quite nicely! I used Wilton gel-paste food colors for the frosting.


The cupcakes were delicious. They were light, tender, and very moist. They were like the quintessential kids' birthday party cupcakes. I can definitely see why so many other people say that these are their go-to yellow cupcakes.

And the frosting was fabulous, too! So often, American buttercream icing can be so cloyingly sweet that you get sick from eating it. That's not the case with this frosting. The technique Martha employs, of alternating between beating it at a very high speed for short bursts, and beating it at a lower speed for longer periods, really made the frosting super fluffy (hence the name). It wasn't a dense, heavy frosting; rather, it was light as air and almost felt, texturally, like whipped cream. I even got compliments about it; one person said they don't normally like frosting, but she liked this frosting. I wonder what she'd think of Swiss Meringue Buttercream...

So these were a tremendous hit, cake, frosting, all of it. The little party favors adorning the cupcakes were a hit, too! I found these little Scooby-Doo rings that I was excited to use. It was so easy; I just nestled them right into the frosting. The kids got to take them home with them. My younger son, the 20 month-old, used his ring as his fork. He kept dipping his ring into the frosting, and then ate the frosting off. I thought it was creative!

There will be even more cupcake fun later on this week. The Martha Stewart Cupcakes Club will be making Triple Citrus Cupcakes!


Yellow Buttermilk Cupcakes
from Martha Stewart's Cupcakes
makes 36 cupcakes

Ingredients
3 cups cake flour (not self-rising)
1 1/2 cups all-purpose flour
3/4 tsp. baking soda
2 1/4 tsp. baking powder
1 1/2 tsp. coarse salt
1 cup plus 2 Tbsp. (2 1/4 sticks) unsalted butter, room temperature
2 1/4 cups sugar
5 large whole eggs plus 3 egg yolks, room temperature
2 cups buttermilk, room temperature
2 tsp. pure vanilla extract
Fluffy Vanilla Frosting (recipe follows)
Gel-paste food coloring, optional
Colored sprinkles, optional


Directions
1. Preheat oven to 350 degrees F. Line standard muffin tins with paper liners. Sift together both flours, baking soda, baking powder, and salt.


2. With an electric mixer on medium-high speed, cream butter and sugar until pale and fluffy. Reduce speed to medium. Add whole eggs, one at a time, beating until each is incorporated, scraping down sides of bowl as needed. Add yolks, and beat until thoroughly combined. Reduce speed to low. Add flour mixture in three batches, alternating with two additions of buttermilk, and beating until combined after each. Beat in vanilla.


3. Divide batter evenly among lined cups, filling each three-quarters full. Bake, rotating tins halfway through, until cupcakes spring back when lightly touched and a cake tester inserted in centers comes out clean, about 20 minutes. Transfer tins to wire racks to cool 10 minutes; turn out cupcakes onto racks and let cool completely. Cupcakes can be stored overnight at room temperature, or frozen up to 2 months, in airtight containers. (I froze these the week before the party, and what I did worked well. I place them back in the muffin tins after they were cool, then triple-wrapped each muffin tin in saran wrap. I placed all the tins inside a large plastic bag and pushed as much air out of the bag as I could. Then I tied it off and placed the whole bag in the freezer. When it was time to defrost, I took them out, unwrapped everything, and took the cupcakes out of the tins. Then I allowed them to thaw. They were perfect!)


Fluffy Vanilla Frosting
from Martha Stewart's Cupcakes
makes 4 cups


Ingredients
1 1/2 cups (3 sticks) unsalted butter, room temperature
1 lb. (4 cups) confectioners' sugar, sifted
1/2 tsp. pure vanilla extract


Directions
1. With an electric mixer, beat butter on medium-high speed until pale and creamy, about 2 minutes.

2. Reduce speed to medium. Add the confectioners' sugar, 1/2 cup at a time, beating well after each addition and scraping down sides of bowl as needed; after every two additions, raise speed to high and beat 10 seconds to aerate frosting, then return to medium. This process should take about 5 minutes. Frosting will be very pale and fluffy.

3. Add vanilla, and beat until frosting is smooth. If not using immediately, frosting can be refrigerated up to 10 days in an airtight container. Before using, bring to room temperature, and beat on low speed until smooth again, about 5 minutes. (If coloring your frosting, it can either be done right after beating, or after storing in the refrigerator and beating again. Add gel-paste food coloring until you reach the desired shade. Frost and decorate cupcakes as desired.)

Thursday, August 12, 2010

CEIMB: Sloppy Joes


This week's wonderful Craving Ellie in My Belly selection was Sloppy Joes. It was chosen by Chaya, of Chaya's Comfy Cook Blog. I've made this meal from Ellie Krieger's The Food You Crave book before, but I never stuck exactly to the recipe. I can't say I followed it to the T this time, either, but I came a little bit closer!


Up until recently, if I ever saw beans contained within an ingredients list, I would just omit them. I'm talking mainly about canned beans here. You know, black beans, white beans, red beans. When I made these Sloppy Joes before, the beans certainly did not make it into the pot. However, if there's anything this group has always succeeded in, it's getting me to try something I normally would not. So I threw my reservations to the wind and made this one beans and all!


As usual, this Ellie recipe was a cinch to make. Brown the meat (I used ground turkey) with onions, then add bell pepper (I used green), jalapeno pepper, and garlic. Then, you add in the rest of the ingredients (except the buns, as Ellie helpfully points out! I thought that was hilarious!) and simmer. For the dreaded beans, I found a can of pinto beans where the beans were in a "zesty" sauce, so I thought that would give my sloppy joes a bit more zip. Therefore, I added a bit less tomato sauce, because I knew there would be extra liquid in with the beans.


I used some sturdy whole-grain ciabatta rolls for the buns, served some mini pierogies on the side, and we were ready to eat! I admit, I did really enjoy this the way I made it this time! The beans added more substance without being completely obvious. I thought the spices and seasonings were great, and the jalapeno I used really mellowed out while cooking; this wasn't really spicy at all. I have a good amount of leftovers, and I'm imagining using up the rest tomorrow in some tortillas! Yum, Sloppy Joe soft tacos!

Thank you, Chaya, for the great pick. Check out how the other members of the group made out with this recipe over at the CEIMB blogroll. The original recipe can be found on Chaya's blog, and also on Food Network's site, here.