Saturday, August 21, 2010

Scooby-Doo, and a Recipe Too!


Okay, first of all, I should apologize for the lighting in these photos. Boy, it really makes everything look unnaturally bright and washed out. These pictures were taken late at night before my son's 5th birthday, and I found that the cake looked even worse in the morning light the next day. Go figure! So I'm presenting you with the lesser of two evils.
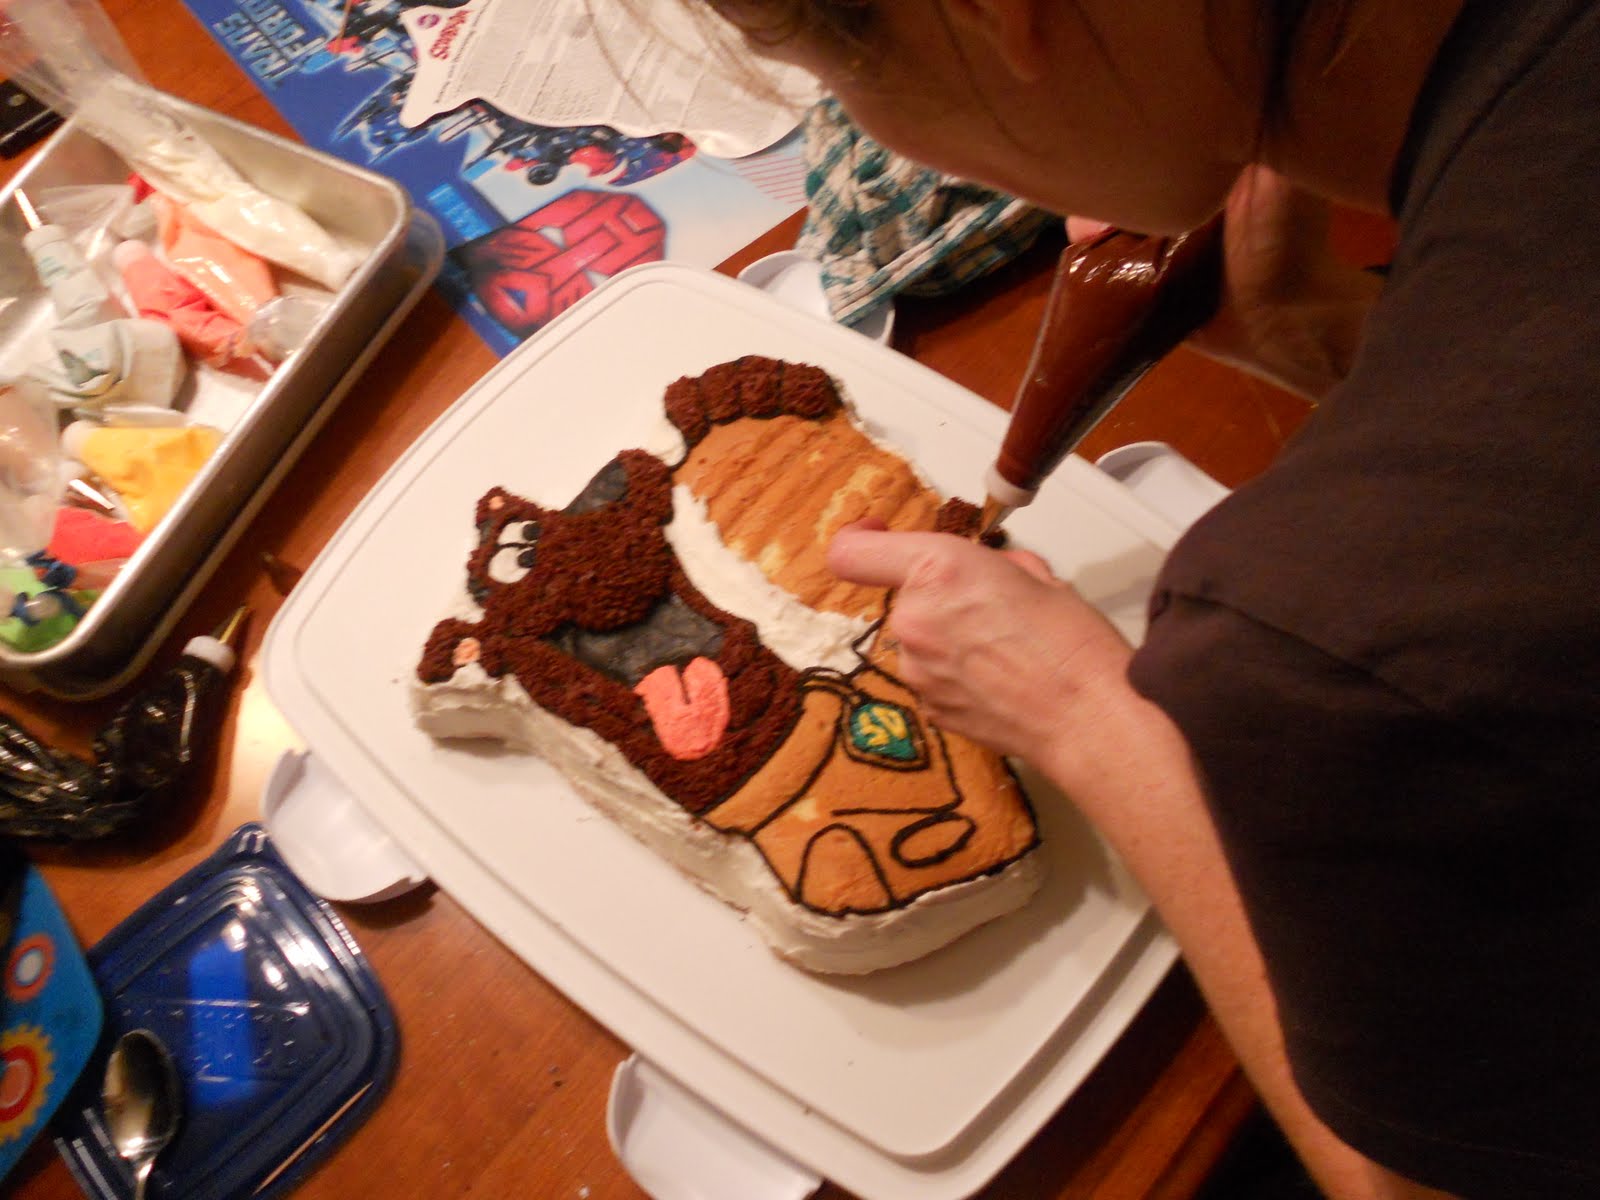


This cake was the capper on a week of Scooby-Doo treats that I had prepared for his special day. There were the cookies, then there were the cupcakes. He wanted everything to be Scooby-themed; even most of his gifts this year were Scooby-related. This cake was the piece de resistance, the crowning touch to end the festivities.


We were fortunate enough to find this cake pan at a Michael's store about 5 months ago. I made Xander promise me that he would not change his mind about wanting a Scooby-themed birthday party this year, and he kept his word. Hard to believe, but he is still just as much in love with Scooby now as he was 5 months ago! Anyway, we grabbed the cake pan that day at Michael's because they don't usually carry it, and it was on clearance. I've never seen another one since, so I'm glad to have found it.


This was hard, intricate work, let me tell ya. I've done a pirate ship-shaped cake before, so I was familiar with this style of decorating. This was much more difficult, though. It required you to first frost the sides and background sections with plain white frosting. Then, you had to trace Scooby's entire outline in black frosting. Andy helped me do Scooby's nose and mouth, while I worked on his tongue and eyes. Next, you could fill in the brown fur sections and his dog tag and collar. Finally, I did Scooby's hamburger, and then I outlined the entire cake with a bunch of orange stars (Xander's favorite color is orange, and I thought it went just fine with the rest of the cake).


I used a new cake recipe for this one, and I was really happy with it. It comes from a cookbook I've come to really enjoy lately, The Craft of Baking. It's for a basic yellow layer cake with a milk chocolate buttercream, but obviously I went in a different direction with my frosting. This cake almost reminds me of sponge cake; by folding egg whites into the batter before baking, you produce a light, airy cake that holds together incredibly well, and is tender and moist at the same time. Best of all, it is not too sweet, so the buttercream I used paired well with the cake.

In case you're wondering about the frosting, it's actually the Wilton recipe for buttercream. It's sinful, I know, because it contains some shortening. I justified this by reasoning that since I was using up all the Crisco I had in the house (which I had bought when I took Wilton's cake decorating classes), and because it was a special occasion, it'd be okay. And it does work very well for this type of decorating project. To make the brown for Scooby's fur (I think I made it a bit too dark) and the black for his outline, I added some cocoa powder to some of the frosting, then added a bit of water to thin it out. Then I just tinted the rest of my white frosting with various shades of gel-paste food coloring.

I'm including the recipes for the yellow cake and the Wilton frosting below. I would love to try this cake next time with the frosting in the cookbook, though. I have no doubt it would be sublime. Until then, here you go!


Yellow Layer Cake

from The Craft of Baking

makes one 10-inch layer cake (or one Scooby-Doo cake plus about 4 cupcakes!)

Ingredients

2 Tbsp. unbleached all-purpose flour

12 Tbsp. (1 1/2 sticks) unsalted butter, very soft, plus extra for the pans

1 3/4 cups sugar

1 1/2 tsp. pure vanilla extract

7 large egg yolks

3 cups cake flour

1 tsp. kosher salt

3/4 tsp. baking powder

3/4 tsp. baking soda

1 cup plus 2 Tbsp. sour cream

7 large egg whites


Directions

1. Butter the bottoms and sides of three 8-inch cake pans and line the bottoms of the pans with rounds of parchment paper. Butter the tops of the paper liners, and then dust the pans with the all-purpose flour, tapping off any excess. Preheat the oven to 350 degrees F.

2. In the bowl of an electric mixer fitted with the paddle attachment, mix the butter, 1 1/2 cups of the sugar, and vanilla extract on medium speed, scraping down the sides of the bowl several times, until pale and fluffy, 5 minutes. Add the egg yolks, one at a time, letting each become incorporated into the batter before adding the next.

3. In a separate bowl, sift together the cake flour, salt, baking powder, and baking soda. Reduce the mixer speed to low and alternate adding the flour mixture and the sour cream to the butter mixture, adding one third of each at a time and letting them fully mix in before adding the next. When all of the flour mixture and sour cream have been added, turn the mixer to medium-high speed and mix for about 2 minutes, to fully incorporate the ingredients and help build the structure.

4. Scrape the batter into a large mixing bowl. Clean the bowl to the mixer well and, using the whisk attachment, whip the egg whites on low speed until frothy, about 5 minutes. (Instead of doing this, I just used a hand mixer and whipped the egg whites in a smaller bowl, then proceeded with the recipe.) Add the remaining 1/4 cup sugar and increase speed to medium high. Whip whites to soft peaks, then fold them into the batter in 3 additions.

5. Divide the batter between the three prepared cake pans and spread it out evenly with a spatula. Place pans on two baking sheets. Bake the cakes, rotating the pans and switching the cakes between the upper and lower racks of the oven halfway through, until they are lightly golden on top, gently bounce back when touched, and a cake tester inserted in the center of the cake comes out clean, 30 to 35 minutes. (Mine obviously took about 15 to 20 minutes longer, due to the size of the Scooby pan.)

6. Transfer the cake pans to a wire rack and let the cakes cool for 30 minutes. Then remove them from the pans and let them cool completely, at least 3 hours, before frosting.


Buttercream Icing

from Wilton

makes about 3 cups


Ingredients

1/2 cup solid vegetable shortening

1/2 cup (1 stick) butter or margarine, softened

1 tsp. clear vanilla extract

1 Tbsp. meringue powder

4 cups sifted confectioners' sugar (about 1 lb.)

2 Tbsp. milk

3 Tbsp. cocoa powder

1-2 Tbsp. water

Gel-paste food coloring


Directions

1. In large bowl, cream shortening and butter with an electric mixer. Add vanilla, then the meringue powder. Gradually add sugar, one cup at a time, beating well on medium speed. Scrape sides and bottom of bowl often. When all sugar has been mixed in, icing will appear dry. Add milk and beat on medium speed until light and fluffy. Keep bowl covered with a damp cloth until ready to use.

2. For best results, keep icing bowl in refrigerator when not in use. Refrigerated in an airtight container, this icing can be stored 2 weeks. Rewhip before using.

3. For chocolate buttercream, proceed through the confectioners' sugar addition, then add cocoa powder. Add water gradually, a bit at a time, then the milk, until the desired consistency is achieved. Add more or less than the recipe calls for, depending on how thick/thin you'd like your icing to be.

Thursday, August 19, 2010

100th Post! CEIMB: Salmon Cakes with Ginger-Sesame Sauce


I really cannot believe that I have hit 100 posts! It just doesn't seem possible, and yet here I am. I wish I had something incredibly elaborate or fancy to present to you for the occasion, but alas it is time for another good old Craving Ellie in My Belly! I also wish I could say that I made something I really loved for this occasion, but I actually didn't even eat this week's pick. It's all good, though. The hubby really enjoyed it!


When I first discovered that this week's choice was Salmon Cakes with a Ginger-Sesame Sauce, I knew I probably was not going to be eating it. I'm sorry, I just can't do salmon. Not to mention my extreme dislike of both yogurt and mayonnaise (the two primary ingredients in the dipping sauce). Yeah, it just was not going to be in the cards for me. Originally I just wanted to do an Ellie rewind recipe; you know, try out something the group made way before I joined. But then the hubs found out that the recipe was salmon. After a bit of persuading, I agreed to make the cakes for him after all. I made a third of the full recipe, and got four patties.


I would love to be able to tell you that I was very brave and tried the salmon cakes, but I'd be lying. I know they're probably great, but I just could not get past the smell of the canned salmon. After inhaling those fumes while preparing this, I just couldn't eat them. I don't know; I'm sure I'm just strange, and that I'm going to read the other CEIMBers' blogs and find out that these were a rousing success. And they were a success, at least for my husband. He said they were delicious. He especially liked the sauce. I had to make it with sour cream instead of yogurt, since that is what I had on hand. I was afraid that may have been the wrong thing to do, but apparently not since he loved it!


Thank you, Sarah of Sarah's Kitchen Adventures, for a pick that was a definite hit with my hubby. I'm sorry I didn't eat it myself, but know that it was loved! I served it with some roasted corn on the cob and some bacon-wrapped jalapeno poppers (recipe coming soon). This recipe can be found here, on Food Network's website. I'm anxious to see what everyone else thought of this one!

Tuesday, August 17, 2010

Comfort Meatballs with Crash Hot Potatoes (from the Pioneer Woman)


Wow. I can't believe I waited so long to make these recipes. I mean, they've both been on my radar for a while now. The Comfort Meatballs are one of the many, many dishes I've been dying to try out of Ree Drummond's cookbook, The Pioneer Woman Cooks. I've had that book for nearly a year now, and I realize it's been terribly underused. I say that because this is the first thing I've made out of it, and it was to die for. As for the Crash Hot Potatoes? Also to die for. Crisp on the outside and perfect and tender on the inside, these fluffy taters are truly unique and delicious.


The meatballs begin with just a basic, standard meat and oats mixture. Add some milk, minced onion, salt, and pepper, mix, and shape into meatballs. Allow them to set up in the fridge for a bit.


Then, you brown the meatballs on the stove and pour a sauce all over them. The sauce is also made up of very basic ingredients. It contains some ketchup, some Worcestershire, a bit of Tabasco, some vinegar, sugar, and minced onion. Once those ingredients mix, however, they become magical. Really. I can't explain it, except to say that I don't even like ketchup by itself, and I could have eaten this sauce straight, with a spoon. I mean, it's just yummy.

So then you bake the meatballs with the sauce poured all over. They become baked through, and the sauce becomes gooey and bubby and perfectly wonderful. I'm sure these meatballs would have been even more decadent if I'd made them with ground beef, but they were fabulous with ground turkey.


Now, as if that weren't enough wonderful-ness for one meal, you get these potatoes on the side! Man, were these good! I couldn't stop picking at them while I was getting the rest of the meal together. They're so easy to do, too. There's just no reason for me not to make these at least weekly. Or more than weekly. In fact, I'd like to make them right now...

All you need to do is boil some small potatoes until fork-tender, then place them on a baking sheet. Next, you get to squash them with a potato masher! It was very fun, especially for my 5 year-old son. You just squash them once in one direction, then turn the masher 90 degrees and squash again in the opposite direction. This makes them all textured, and sorta flat. I compared them to home fries after making them. But tastier. Much, much tastier.

After you've "crashed" all the taters, you can season them with salt and pepper, as well as any herbs you may have lying around. I didn't use any herbs this time, but I didn't miss them. These were sublime with just good ol' s&p. Finally, make sure they have enough olive oil on them that they will not burn, and then bake them. That's it. Easy to make, and great for aggression if you're in the mood to squish something! I highly recommend making this meal next time you're in the mood for meat and potatoes. It just doesn't get much better than this!


Comfort Meatballs
from The Pioneer Woman Cooks
makes 6 to 8 servings


Ingredients
For the meatballs
1 1/2 lbs. ground beef (I used turkey)
3/4 cup quick oats
1 cup milk
3 Tbsp. very finely minced onion
1 1/2 tsp. salt
Freshly ground black pepper
4 Tbsp. canola oil
1/2 cup flour

For the sauce
1 cup ketchup
2 Tbsp. sugar
3 Tbsp. distilled white vinegar
2 Tbsp. Worcestershire sauce
4 to 6 Tbsp. minced onion
Dash of Tabasco


Directions
1. In a bowl, combine the ground beef and oats. Pour in the milk, then add the diced onion and salt. Add the black pepper, then stir to combine.

2. Roll the mixture into tablespoon-sized balls and refrigerate them for 30 to 45 minutes to firm. Preheat the oven to 350 degrees F. Heat the canola oil in a large skillet over medium heat. Dredge the meatballs in the flour.

3. Brown the meatballs in batches until light brown. As they brown, place them into a rectangular baking dish.

4. Stir together the sauce ingredients and drizzle the sauce evenly on the meatballs. Bake for about 45 minutes or until bubbly and hot.


Crash Hot Potatoes
from the Pioneer Woman's website
makes about 6 servings


Ingredients
12 whole new potatoes (or other small round potatoes)
3 Tbsp. olive oil
kosher salt to taste
black pepper to taste
Rosemary (or other herbs of choice) to taste (I did not have rosemary)


Directions
1. Bring a pot of salted water to a boil. Add in as many potatoes as you wish to make and cook them until they are fork-tender.

2. On a sheet pan, generously drizzle olive oil. Place tender potatoes on the cookie sheet, leaving plenty of room between each potato. With a potato masher, gently press down each potato until it slightly mashes. Rotate the masher 90 degrees and mash again. Brush the tops of each crushed potato generously with olive oil.

3. Sprinkle potatoes with kosher salt, fresh ground black pepper, and fresh chopped rosemary (or chives or thyme or whatever herb you have available). Bake in a 450 degree oven for 20 to 25 minutes, until golden brown.

Sunday, August 15, 2010

MSC: Triple Citrus Cupcakes


Wow, two cupcake posts in one week! The other day I shared my Scooby-Doo Yellow Buttermilk Cupcakes, and today I give you these Triple Citrus Cupcakes. They sounded like they would be light, summery, and refreshing! They were chosen by Marthe of Culinairy Delights for the Martha Stewart Cupcakes Club, and I was really looking forward to trying them.


Well, unfortunately, these fell a little bit short of my expectations for them. I know that sometimes Martha's cupcake recipes have a reputation for being a bit dry, or dense, or too muffin-like, and I felt like that was the case with these particular cupcakes. They almost reminded me of cornbread in texture, and although cornbread can be delicious, it doesn't necessarily scream light and fluffy.


They're pretty easy to make, though! That fun picture of my stand mixer you saw earlier was all the beautiful, colorful citrus zest that went in with the butter and sugar. It smelled absolutely amazing! I did think 4 sticks of butter in one cupcake recipe was a tad ridiculous, but I went with it.

After the zest mixes in with the butter/sugar mixture, you add vanilla, then 9 (yes, 9!) eggs. Then the flour and salt goes in, and that's it for the batter. While I was making these, I found it odd that there was no baking soda or baking powder in the recipe. Again, I went with it. I figured Martha knew what she was doing.


The cupcakes were heavy, indeed, but the flavor was very nice. I loved the delicate citrus flavor throughout, and I could envision these being eaten without glaze for breakfast. With the glaze, though, they did become much more dessert-y. It's just a simple powdered sugar/citrus juice glaze, with a bit of zest sprinkled in. My cupcakes seemed to absorb some of the glaze; it didn't sit all nice and thick on top of the cupcake like the one in the picture in the cookbook did.

I have to say, though, that my review of these cupcakes was just my opinion. Andy took these in to work, and they were very well-received there. People really loved them; I even heard they were hiding them from other people in the building! So it just goes to show you, it's all a matter of taste. Do check out what the other Martha bloggers thought of these, over at the MSCC blogroll! You can also find the full recipe here, on Martha's website.


Friday, August 13, 2010

Yellow Buttermilk Cupcakes with Fluffy Vanilla Frosting


Well, the Scooby-Doo theme continues! The other day I posted about my Scooby-Doo Dog Tag Sugar Cookies, and now I'm going to tell you about my Scooby-Doo Cupcakes! For my son's 5th birthday party at a local children's bouncey house, I decided to go with cupcakes because they're easy, they're kid-friendly, and it would give me an excuse to once again whip out my trusty Martha Stewart's Cupcakes book!


I knew the birthday boy would want cupcakes that were as plain and simple as could be. Therefore, this was the perfect opportunity to finally try out Martha's Yellow Buttermilk Cupcakes with Fluffy Vanilla Frosting. My son's kinda strange, for a 5 year-old. He does not like chocolate cake, only vanilla. He absolutely hates frosting; I had to serve him a plain, "naked" cupcake with no frosting on top. And I wouldn't even dream of offering him ice cream with his cake; he won't even touch the stuff. I thought I'd be safe with the yellow cupcakes, and I could give the vanilla frosting to his party guests, but not to him.


I was lucky enough to find these adorable Scooby-Doo cupcake papers on Ebay, and I originally contemplated frosting each cupcake with two different-colored frostings at once. However, that made me nervous because I've never done something like that before. I decided I didn't want to risk there being a cupcake disaster the morning of the party! So in the end I kept it simple and did half the cupcakes bright orange (Xander's favorite color) and half the cupakes teal. The colors were great, really vivid, and I thought they represented the colors on Scooby and the gang's Mystery Machine quite nicely! I used Wilton gel-paste food colors for the frosting.


The cupcakes were delicious. They were light, tender, and very moist. They were like the quintessential kids' birthday party cupcakes. I can definitely see why so many other people say that these are their go-to yellow cupcakes.

And the frosting was fabulous, too! So often, American buttercream icing can be so cloyingly sweet that you get sick from eating it. That's not the case with this frosting. The technique Martha employs, of alternating between beating it at a very high speed for short bursts, and beating it at a lower speed for longer periods, really made the frosting super fluffy (hence the name). It wasn't a dense, heavy frosting; rather, it was light as air and almost felt, texturally, like whipped cream. I even got compliments about it; one person said they don't normally like frosting, but she liked this frosting. I wonder what she'd think of Swiss Meringue Buttercream...

So these were a tremendous hit, cake, frosting, all of it. The little party favors adorning the cupcakes were a hit, too! I found these little Scooby-Doo rings that I was excited to use. It was so easy; I just nestled them right into the frosting. The kids got to take them home with them. My younger son, the 20 month-old, used his ring as his fork. He kept dipping his ring into the frosting, and then ate the frosting off. I thought it was creative!

There will be even more cupcake fun later on this week. The Martha Stewart Cupcakes Club will be making Triple Citrus Cupcakes!


Yellow Buttermilk Cupcakes
from Martha Stewart's Cupcakes
makes 36 cupcakes

Ingredients
3 cups cake flour (not self-rising)
1 1/2 cups all-purpose flour
3/4 tsp. baking soda
2 1/4 tsp. baking powder
1 1/2 tsp. coarse salt
1 cup plus 2 Tbsp. (2 1/4 sticks) unsalted butter, room temperature
2 1/4 cups sugar
5 large whole eggs plus 3 egg yolks, room temperature
2 cups buttermilk, room temperature
2 tsp. pure vanilla extract
Fluffy Vanilla Frosting (recipe follows)
Gel-paste food coloring, optional
Colored sprinkles, optional


Directions
1. Preheat oven to 350 degrees F. Line standard muffin tins with paper liners. Sift together both flours, baking soda, baking powder, and salt.


2. With an electric mixer on medium-high speed, cream butter and sugar until pale and fluffy. Reduce speed to medium. Add whole eggs, one at a time, beating until each is incorporated, scraping down sides of bowl as needed. Add yolks, and beat until thoroughly combined. Reduce speed to low. Add flour mixture in three batches, alternating with two additions of buttermilk, and beating until combined after each. Beat in vanilla.


3. Divide batter evenly among lined cups, filling each three-quarters full. Bake, rotating tins halfway through, until cupcakes spring back when lightly touched and a cake tester inserted in centers comes out clean, about 20 minutes. Transfer tins to wire racks to cool 10 minutes; turn out cupcakes onto racks and let cool completely. Cupcakes can be stored overnight at room temperature, or frozen up to 2 months, in airtight containers. (I froze these the week before the party, and what I did worked well. I place them back in the muffin tins after they were cool, then triple-wrapped each muffin tin in saran wrap. I placed all the tins inside a large plastic bag and pushed as much air out of the bag as I could. Then I tied it off and placed the whole bag in the freezer. When it was time to defrost, I took them out, unwrapped everything, and took the cupcakes out of the tins. Then I allowed them to thaw. They were perfect!)


Fluffy Vanilla Frosting
from Martha Stewart's Cupcakes
makes 4 cups


Ingredients
1 1/2 cups (3 sticks) unsalted butter, room temperature
1 lb. (4 cups) confectioners' sugar, sifted
1/2 tsp. pure vanilla extract


Directions
1. With an electric mixer, beat butter on medium-high speed until pale and creamy, about 2 minutes.

2. Reduce speed to medium. Add the confectioners' sugar, 1/2 cup at a time, beating well after each addition and scraping down sides of bowl as needed; after every two additions, raise speed to high and beat 10 seconds to aerate frosting, then return to medium. This process should take about 5 minutes. Frosting will be very pale and fluffy.

3. Add vanilla, and beat until frosting is smooth. If not using immediately, frosting can be refrigerated up to 10 days in an airtight container. Before using, bring to room temperature, and beat on low speed until smooth again, about 5 minutes. (If coloring your frosting, it can either be done right after beating, or after storing in the refrigerator and beating again. Add gel-paste food coloring until you reach the desired shade. Frost and decorate cupcakes as desired.)

Thursday, August 12, 2010

CEIMB: Sloppy Joes


This week's wonderful Craving Ellie in My Belly selection was Sloppy Joes. It was chosen by Chaya, of Chaya's Comfy Cook Blog. I've made this meal from Ellie Krieger's The Food You Crave book before, but I never stuck exactly to the recipe. I can't say I followed it to the T this time, either, but I came a little bit closer!


Up until recently, if I ever saw beans contained within an ingredients list, I would just omit them. I'm talking mainly about canned beans here. You know, black beans, white beans, red beans. When I made these Sloppy Joes before, the beans certainly did not make it into the pot. However, if there's anything this group has always succeeded in, it's getting me to try something I normally would not. So I threw my reservations to the wind and made this one beans and all!


As usual, this Ellie recipe was a cinch to make. Brown the meat (I used ground turkey) with onions, then add bell pepper (I used green), jalapeno pepper, and garlic. Then, you add in the rest of the ingredients (except the buns, as Ellie helpfully points out! I thought that was hilarious!) and simmer. For the dreaded beans, I found a can of pinto beans where the beans were in a "zesty" sauce, so I thought that would give my sloppy joes a bit more zip. Therefore, I added a bit less tomato sauce, because I knew there would be extra liquid in with the beans.


I used some sturdy whole-grain ciabatta rolls for the buns, served some mini pierogies on the side, and we were ready to eat! I admit, I did really enjoy this the way I made it this time! The beans added more substance without being completely obvious. I thought the spices and seasonings were great, and the jalapeno I used really mellowed out while cooking; this wasn't really spicy at all. I have a good amount of leftovers, and I'm imagining using up the rest tomorrow in some tortillas! Yum, Sloppy Joe soft tacos!

Thank you, Chaya, for the great pick. Check out how the other members of the group made out with this recipe over at the CEIMB blogroll. The original recipe can be found on Chaya's blog, and also on Food Network's site, here.


Monday, August 9, 2010

Scooby-Doo's Dog Tag Sugar Cookies


Behold, my first attempt at making sugar cookie cutouts that are decorated all fancy-like. Xander just had his 5th birthday party (so expect more posts in the next week or so about some of the other stuff I made for the birthday boy!) over the weekend. For the theme, he chose Scooby-Doo. This was hardly a shock; the boy is Scooby-obsessed lately. So I decided it would be fun to make some decorated sugar cookies and put them in each of the goody bags we would give out at the end of the party.


I realized when choosing a design that I needed the shape to be as simple as possible. I mean, I'm just a beginner at this, so I didn't want to worry about cutting out dog shapes or something difficult like that. I settled on Scooby's diamond-shaped dog tag, on his collar. Following Martha Stewart's recipe for basic sugar cookie cutouts was easy. It turns out that you really have to devote a lot of time to chilling the dough, then letting it rest, then rolling out the shapes, then freezing the shapes before baking. That last step really helps a lot. It helps so much with maintaining the shape of the cookie while it's in the oven.


So now that I had my perfectly formed cookies, I was all set to decorate! Now, I made some mistakes this time around, but I have learned from those mistakes and I'm getting the hang of things. I had been debating whether to outline the diamond in yellow, then flood the entire inside with the blue. After letting that sit for at least 12 hours, I could then pipe Scooby's initials on top. As it turns out, that would have been smart, but I didn't go that route.

What we did (because I'm impatient and I asked Andy to help decorate after I'd done only 3 cookies) was outline the entire diamond in yellow, then write the SD initials. After about an hour, when the yellow had hardened, we flooded the rest of the cookie with blue.

I'll back up a bit here. I'd been looking at other blogs the week leading up to this decorating extravaganza, getting an idea of what I should do. Among the best resources out there were Bake at 350 and Sweetopia; I think so, anyway. I learned all about how the outlining should be done with the royal icing that you initially make. Then, when you need to flood, or fill in, the cookie, you need to thin out the royal icing so it's a good consistency for filling and spreading. I did all that without a hitch. However, having never worked with the thinned icing before, I didn't realize how much harder I was making it on myself to have to fill in all the nooks and crannies around the SD initials.


So it was slow and tedious work. But it won't be next time I decide to make cookies, because now I know better! If I had just saved the initials for last, it would have been a piece of cake. But as I said, I've learned now, and I can only improve from here!

I thought, after everything was said, and done, and decorated, that they turned out really cute. I was very aware of the spots that weren't perfectly smooth, or the places where I had accidentally smudged blue up over the yellow lines, but nobody had anything negative to say about them. Plus, they were....original! I mean, you could definitely tell they were handcrafted, for better or worse. They were like snowflakes; no two exactly the same! I had a blast with this, and I can't wait to try again. I need the practice!


Sugar Cookie Cutouts
makes about 2 dozen 4-inch cookies


Ingredients
4 cups sifted all-purpose flour, plus more for dusting
1 tsp. baking powder
1/2 tsp. salt
1 cup (2 sticks) unsalted butter, room temperature
2 cups sugar
2 large eggs
2 tsp. pure vanilla extract
Royal Icing (optional, recipe follows)


Directions
1. Sift flour, baking powder, and salt into a bowl.

2. Put butter and sugar in the bowl of an electric mixer fitted with the paddle attachment. Mix on medium speed until pale and fluffy. Mix in eggs and vanilla. Reduce speed to low. Gradually mix in flour mixture. Divide dough in half; flatten each half into a disk. Wrap each in plastic. Refrigerate until firm, at least 1 hour or overnight.

3. Preheat oven to 325 degrees F, with racks in upper and lower thirds. Let one disk of dough stand at room temperature just until soft enough to roll, about 10 minutes. Roll out dough on a lightly floured work surface to just under 1/4 inch thick, adding more flour as needed to keep dough from sticking. Cut out cookies with desired cookie cutter, transferring shapes to parchment paper-lined baking sheets as you work. Roll out the scraps, and repeat. Repeat with remaining disk of dough. Chill cookies in freezer until very firm, about 15 minutes.

4. Bake, switching positions of sheets and rotating halfway through, until edges turn golden, 15 to 18 minutes. Let cool on sheets on wire racks. To decorate, tint icing with food coloring, if using. Flood tops of cookies with icing. Continue to decorate as desired. After icing cookies, let them sit out overnight to set. Cookies can be stored between layers of parchment in an airtight container at room temperature up to 1 week.


Royal Icing
covers 2-3 dozen cookies in 2 colors


Ingredients
4 Tbsp. meringue powder
scant 1/ cup water
1 lb. powdered sugar, sifted
1/2 tsp. light corn syrup (optional, but I used it)
few drops clear extract (optional, but I used it)
gel-paste food coloring (optional, but I used it)


Directions
1. In the bowl of an electric mixer fitted with the paddle attachment, combine the meringue powder and the water. Beat until combined and foamy. Sift in the powdered sugar, and beat on low to combine. Add in the corn syrup and extract, if using.

2. Increase the speed to medium-high/high and beat for about 5 minutes, just until the icing is glossy and stiff peaks form. Do not overbeat.

3. Cover with plastic wrap covering the surface of the icing, or divide and tint as desired. (I stored mine in the refrigerator until ready to use.)