Showing posts with label cake decorating. Show all posts

Saturday, August 13, 2011

Roasted Red Pepper and Feta Spread (Plus a Birthday Cake!)


This weekend is my oldest son's sixth birthday. I can't, for the life of me, believe that I have a child going into first grade! It seems like only moments ago, he was born and I was holding a little baby (okay, maybe not so little. He was nearly 9 pounds when he came into the world!). But enough of me strolling down memory lane. We have a cake to discuss here!


I blogged about this Butterscotch Krimpet cake a couple months ago, and I mentioned how much my son loved it. Turns out, he loved it enough to request it as his birthday cake this year! It actually works out great, because orange is his favorite color, and the butterscotch frosting is naturally orange. I did add a couple drops of orange gel food coloring to make it pop a bit more, and I think it turned out nice and vibrant. I baked the cake in two round 9-inch cake pans, slathered a generous helping of frosting in between the layers, and piped a teal border around the top and bottom of the cake. Since his favorite TV show is Scooby Doo, he wanted there to be some sort of Scooby theme. So, orange and teal represent Scooby, and just before serving the cake we pressed a few of his Scooby Doo action figures onto the top. Voila!


Now, I promised you a Roasted Red Pepper and Feta Spread recipe, and I did not forget about it. This is my own, made-up version of a white bean hummus with a nice chunk of feta and a roasted red pepper thrown in for good measure. I decided to make it to go along with my CEIMB recipe this past week, since I was too chicken-y to try the assigned feta spread. I really loved it; give it a try and see if you agree!


Roasted Red Pepper and Feta Spread
recipe by Bri
makes about 2 cups

Ingredients
1 (15-ounce) can cannellini beans, preferably low-sodium, drained and rinsed
1 roasted red pepper, drained and coarsely chopped
1/4 cup (1 ounce) feta cheese, crumbled
Juice of 1 lemon
2 Tbsp. tahini (sesame seed paste)
1/2 tsp. ground cumin
1/2 tsp. dried oregano
1 jalapeno pepper, seeded and coarsely chopped
Salt and freshly ground black pepper, to taste

Directions
1. In the bowl of a food processor, combine the cannellini beans, roasted red pepper, and feta cheese. Pulse a few times to break up the ingredients. Add the remaining ingredients, turn on the food processor, and blend until very smooth. Transfer to an airtight container; store in the refrigerator.

Wednesday, June 15, 2011

MSC: Father's Day Tee-Time Cupcakes


This month's Martha Stewart's Cupcakes Club pick was the Father's Day Tee-Time Cupcakes, chosen by Julie of Little Bit of Everything. I was eager to try my hand at something a bit different for this group: a project that focused on the cupcake's appearance, rather than the cupcake's taste or fun flavor. I knew my kids would be on board with this one, too!


For the cupcakes themselves, I tried a recipe that I've really been wanting to make for a long time. I found it a couple years ago in an issue of Cooking Light. It's a Coconut Cupcake with Lime Buttercream; yum! I just thought that sounded so summery and refreshing; plus, anything with lime automatically catches my eye. I tinted the lime buttercream frosting green, and decided to use that shade as my putting green surface, rather than covering the frosting in green sprinkles. I guess I figured my kids and I didn't really need a mouthful of sanding sugar in every bite!


My five year-old actually is frosting-averse, so he opted to decorate his with just some ground-up graham cracker crumbs (for the sand traps), some mini M&Ms (for the golf balls), and just a bit of green sanding sugar (to make some grass). I made my little flags by affixing some trimmed, bright orange Post-It notes to toothpicks; I thought it worked pretty well, although I did have to apply a bit of transparent tape to each to secure it.

This was a great way for me to spend an afternoon with my boys; they enjoyed the decorating, and eating the leftover decorations! As for the cupcakes themselves, it was a mixed bag. My husband and I thought they were delicious; I was so impressed with the texture of the cupcakes in particular. These are a lower fat version of a dessert, but they really don't taste like it. I think my substitution of coconut milk for skim milk in the recipe made the cakes a bit fluffier and lighter. Considering that some of the recipes from Martha's cupcake book have turned out denser and drier than I would have liked, this was a very nice surprise. If you like the lime/coconut flavor combination, I highly recommend these cupcakes. And I recommend the decorating idea if you need a tasty, fun way to spend an afternoon with kids! Thanks, Julie!


Coconut Cupcakes with Lime Buttercream Frosting
adapted from Cooking Light
makes 12 cupcakes

Ingredients
For the cupcakes:
Cooking spray
4.5 oz. all-purpose flour (about 1 cup)
3 Tbsp. potato starch (not potato flour)
1 tsp. baking powder
1/2 tsp. kosher salt
2/3 cup granulated sugar
2 Tbsp. unsalted butter, softened
1 large egg
1 large egg white
2/3 cup light, unsweetened coconut milk
2 Tbsp. sweetened, flaked coconut
1/2 tsp. coconut extract

For the frosting:
3 Tbsp. unsalted butter, softened
1/2 tsp. fresh lime zest
1 Tbsp. fresh lime juice
1/2 tsp. light, unsweetened coconut milk
4.75 oz. confectioners' sugar, sifted (about 1 1/3 cups)


Directions
Make the cupcakes: 1. Preheat oven to 350 degrees F. Line 12 muffin cups with muffin liners, then spray the liners with nonstick cooking spray. Set tin aside. Weigh or lightly spoon flour into dry measuring cups; level with a knife. Combine the flour and the next 3 ingredients (through salt) in a small bowl; stir with a whisk.

2. Combine the 2/3 sugar and the 2 Tbsp. butter in a large bowl; mix at medium speed until well-blended; mixture should be the consistency of damp sand. Add egg and egg white, one at a time, beating well after each addition. Add the flour mixture and the coconut milk in three batches, beginning and ending with the flour mixture. Fold in coconut and coconut extract.

3. Spoon batter evenly into prepared muffin cups. Bake at 350 for 18 minutes, or until cupcakes spring back when lightly touched in the center. Cool in pan for 5 minutes; remove from tins onto a wire rack to cool completely.

Make the frosting: 1. Combine the 3 Tbsp. butter, the lime zest and juice, and the coconut milk in a medium bowl; mix until well-blended and smooth. Gradually add the confectioners' sugar, beating just until smooth. Frost each cupcake with about 2 1/2 tsp. frosting.

Saturday, August 21, 2010

Scooby-Doo, and a Recipe Too!


Okay, first of all, I should apologize for the lighting in these photos. Boy, it really makes everything look unnaturally bright and washed out. These pictures were taken late at night before my son's 5th birthday, and I found that the cake looked even worse in the morning light the next day. Go figure! So I'm presenting you with the lesser of two evils.


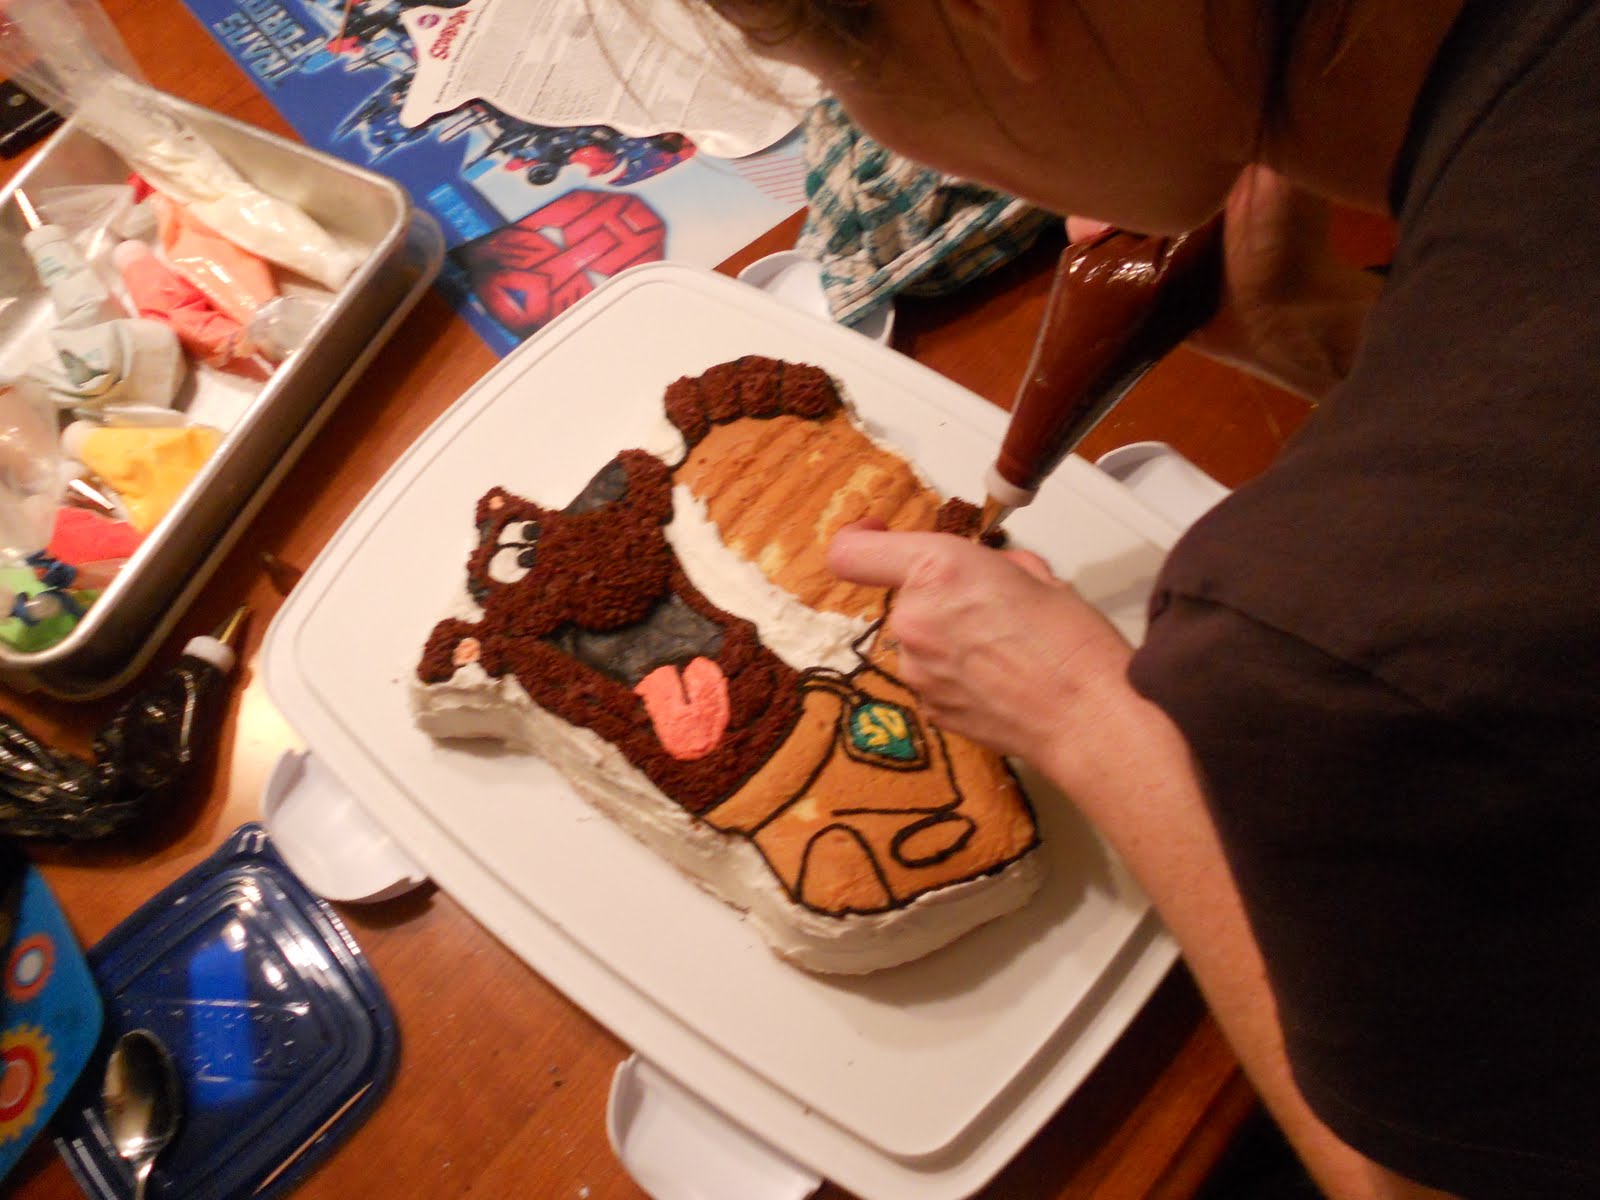
This cake was the capper on a week of Scooby-Doo treats that I had prepared for his special day. There were the cookies, then there were the cupcakes. He wanted everything to be Scooby-themed; even most of his gifts this year were Scooby-related. This cake was the piece de resistance, the crowning touch to end the festivities.


We were fortunate enough to find this cake pan at a Michael's store about 5 months ago. I made Xander promise me that he would not change his mind about wanting a Scooby-themed birthday party this year, and he kept his word. Hard to believe, but he is still just as much in love with Scooby now as he was 5 months ago! Anyway, we grabbed the cake pan that day at Michael's because they don't usually carry it, and it was on clearance. I've never seen another one since, so I'm glad to have found it.


This was hard, intricate work, let me tell ya. I've done a pirate ship-shaped cake before, so I was familiar with this style of decorating. This was much more difficult, though. It required you to first frost the sides and background sections with plain white frosting. Then, you had to trace Scooby's entire outline in black frosting. Andy helped me do Scooby's nose and mouth, while I worked on his tongue and eyes. Next, you could fill in the brown fur sections and his dog tag and collar. Finally, I did Scooby's hamburger, and then I outlined the entire cake with a bunch of orange stars (Xander's favorite color is orange, and I thought it went just fine with the rest of the cake).


I used a new cake recipe for this one, and I was really happy with it. It comes from a cookbook I've come to really enjoy lately, The Craft of Baking. It's for a basic yellow layer cake with a milk chocolate buttercream, but obviously I went in a different direction with my frosting. This cake almost reminds me of sponge cake; by folding egg whites into the batter before baking, you produce a light, airy cake that holds together incredibly well, and is tender and moist at the same time. Best of all, it is not too sweet, so the buttercream I used paired well with the cake.

In case you're wondering about the frosting, it's actually the Wilton recipe for buttercream. It's sinful, I know, because it contains some shortening. I justified this by reasoning that since I was using up all the Crisco I had in the house (which I had bought when I took Wilton's cake decorating classes), and because it was a special occasion, it'd be okay. And it does work very well for this type of decorating project. To make the brown for Scooby's fur (I think I made it a bit too dark) and the black for his outline, I added some cocoa powder to some of the frosting, then added a bit of water to thin it out. Then I just tinted the rest of my white frosting with various shades of gel-paste food coloring.

I'm including the recipes for the yellow cake and the Wilton frosting below. I would love to try this cake next time with the frosting in the cookbook, though. I have no doubt it would be sublime. Until then, here you go!


Yellow Layer Cake

from The Craft of Baking

makes one 10-inch layer cake (or one Scooby-Doo cake plus about 4 cupcakes!)

Ingredients

2 Tbsp. unbleached all-purpose flour

12 Tbsp. (1 1/2 sticks) unsalted butter, very soft, plus extra for the pans

1 3/4 cups sugar

1 1/2 tsp. pure vanilla extract

7 large egg yolks

3 cups cake flour

1 tsp. kosher salt

3/4 tsp. baking powder

3/4 tsp. baking soda

1 cup plus 2 Tbsp. sour cream

7 large egg whites


Directions

1. Butter the bottoms and sides of three 8-inch cake pans and line the bottoms of the pans with rounds of parchment paper. Butter the tops of the paper liners, and then dust the pans with the all-purpose flour, tapping off any excess. Preheat the oven to 350 degrees F.

2. In the bowl of an electric mixer fitted with the paddle attachment, mix the butter, 1 1/2 cups of the sugar, and vanilla extract on medium speed, scraping down the sides of the bowl several times, until pale and fluffy, 5 minutes. Add the egg yolks, one at a time, letting each become incorporated into the batter before adding the next.

3. In a separate bowl, sift together the cake flour, salt, baking powder, and baking soda. Reduce the mixer speed to low and alternate adding the flour mixture and the sour cream to the butter mixture, adding one third of each at a time and letting them fully mix in before adding the next. When all of the flour mixture and sour cream have been added, turn the mixer to medium-high speed and mix for about 2 minutes, to fully incorporate the ingredients and help build the structure.

4. Scrape the batter into a large mixing bowl. Clean the bowl to the mixer well and, using the whisk attachment, whip the egg whites on low speed until frothy, about 5 minutes. (Instead of doing this, I just used a hand mixer and whipped the egg whites in a smaller bowl, then proceeded with the recipe.) Add the remaining 1/4 cup sugar and increase speed to medium high. Whip whites to soft peaks, then fold them into the batter in 3 additions.

5. Divide the batter between the three prepared cake pans and spread it out evenly with a spatula. Place pans on two baking sheets. Bake the cakes, rotating the pans and switching the cakes between the upper and lower racks of the oven halfway through, until they are lightly golden on top, gently bounce back when touched, and a cake tester inserted in the center of the cake comes out clean, 30 to 35 minutes. (Mine obviously took about 15 to 20 minutes longer, due to the size of the Scooby pan.)

6. Transfer the cake pans to a wire rack and let the cakes cool for 30 minutes. Then remove them from the pans and let them cool completely, at least 3 hours, before frosting.


Buttercream Icing

from Wilton

makes about 3 cups


Ingredients

1/2 cup solid vegetable shortening

1/2 cup (1 stick) butter or margarine, softened

1 tsp. clear vanilla extract

1 Tbsp. meringue powder

4 cups sifted confectioners' sugar (about 1 lb.)

2 Tbsp. milk

3 Tbsp. cocoa powder

1-2 Tbsp. water

Gel-paste food coloring


Directions

1. In large bowl, cream shortening and butter with an electric mixer. Add vanilla, then the meringue powder. Gradually add sugar, one cup at a time, beating well on medium speed. Scrape sides and bottom of bowl often. When all sugar has been mixed in, icing will appear dry. Add milk and beat on medium speed until light and fluffy. Keep bowl covered with a damp cloth until ready to use.

2. For best results, keep icing bowl in refrigerator when not in use. Refrigerated in an airtight container, this icing can be stored 2 weeks. Rewhip before using.

3. For chocolate buttercream, proceed through the confectioners' sugar addition, then add cocoa powder. Add water gradually, a bit at a time, then the milk, until the desired consistency is achieved. Add more or less than the recipe calls for, depending on how thick/thin you'd like your icing to be.

Monday, October 12, 2009

Beer Battered Asparagus


So we got it in our heads that it would be a really good idea to make up a batter of flour, salt, pepper, and beer, and toss asparagus in it. From there, we would submerge the battered asparagus in oil and fry it up. With the leftover beer batter, we decided to take a stab at frying chicken thighs and chicken tenders. Well, how did it all turn out? It was beyond our expectations.


As it turns out, frying beer battered asparagus really is a great idea! We were afraid that the batter was a little too simple, that it would have no flavor or just taste really weird. Thankfully, we were wrong. Frying the asparagus actually really brought out the flavor of the vegetable, and they were perfectly cooked inside. They only took about 5 minutes per spear to fry up. Delicious! However, they weren't so good as leftovers, not that I expected them to be. The outside crust turned totally mushy and soggy, not a good combo. We were pleased that we got the chicken to turn out well, too. The first chicken thigh we fried up didn't turn out. We pulled it out of the oil way too early, and it was severely undercooked. A quick internet search taught us that chicken thighs take a much longer time to fry than you would think. I ended up frying each for 15 minutes, and they turned out just perfect. The tenders were good, too.


Before our magical dinner, we had a cupcake decorating party. The ones above were done by me. I figured I would put my new cake decorating skills, as well as all that leftover frosting, to good use and make some cute Halloween-themed designs. Xander found out what I was doing and wanted to do some of his own, so below you will see the ones he decorated all by himself.


It was a splendid mess, but we had a lot of fun, which makes it all worthwhile. Next time I will be better prepared. I need to make sure I cover the whole kitchen table in newspaper so I can just pick up the whole mess of sprinkles and such and dump it right in the trash. A beautiful thing!

Beer Battered Asparagus
adapted from Recipezaar

Ingredients
1 cup all-purpose flour
1 tsp. salt
1 tsp. pepper
1 tbsp lemon zest
1 cup beer
1 lb. asparagus, ends trimmed
vegetable oil, for frying

Directions
1. Heat oil in a heavy saucepan (we used our wok) until it reaches 375 degrees.

2. Whisk together flour, salt, pepper, and lemon zest until combined. Add beer and whisk ingredients until smooth.

3. Dip each asparagus spear in batter to coat. Shake off excess batter, then drop asparagus in oil, a few spears at a time. Stir gently to prevent spears from sticking together. Fry until golden.

4. Transfer spears to a baking sheet lined with paper towels, and keep warm in a 200 degree oven until all the asparagus is done.

Tuesday, October 6, 2009

Cake Decorating Class

Rather than bore you with excuses as to why I haven't written a blog post in months, I thought I would just jump right in with a cute picture of the boys. If they can't entice people to read on, who can?

Anyway, so I have just finished taking a 4-week Wilton cake decorating class at our local Michael's. I had a blast, and I think that with practice I may be able to become good at this whole decorating thing. Right now I still feel like I have a long way to go before I will be ready to have anyone besides my husband and sons actually see one of my finished products up close and personal. The cakes I completed for class always had help and direction from my teacher, so I don't think they really count.


The first cake was this pirate ship cake. I bought a brand new pirate ship cake pan for the occasion. I figured I could practice in class, and then I could attempt to make another one of these for Evan's first birthday. In the future, I think I will change the color scheme. Overall, I think it turned out all right. If I squint, it looks even better!


The next cake we did was a rainbow cake. I feel like this one turned out pretty badly. The rainbow is much thicker on the right side than on the left, and so are the clouds that underline the bottom of the rainbow on that side. But I was proud of the colors that I mixed up, and I dig the stars on the lower half of the cake!


Then, this past Sunday, we did the final cake where we learned how to do the Wilton rose, a crazy feat of frosting if you ask me. I have to admit, I can't take the credit for two of my roses. The teacher actually used my cake as the teaching cake, so she made a couple to demonstrate and then put them right on my cake for me. Part of me was happy to have such attractive flowers adorn my cake! The other part of me was almost disappointed that I had to put my much inferior roses alongside hers. To me, there's a big difference. If you look at the top flower cake picture, mine are the two roses on the lower half of the cake. I know it's hard to see, because the roses are small in the picture, but the two roses on top are so much prettier!

Oh well. Practice will only help at this point. I have a ton of frosting left over now, so I'll have to find something to do with it. Xander and I are overdue to make cupcakes together, so maybe that'll happen this weekend. If we do make some, I'll have to post them on here. And hopefully, it won't be three months from now!