Sunday, April 4, 2010

Easter Cupcakes


Happy Easter! I'll keep this as short as I can; we had a very long day, crammed full of fun Easter activities, and I'm going to be heading to bed soon. But I did want to put up this post first about these cute Easter cupcakes I made.


I did cheat a little bit this time; I made devil's food cupcakes from a mix (gasp, I know!) I was following a recipe where you doctor regular cake mix to produce a peppermint cupcake. Since I wasn't sure how peppermint cupcakes would be received by a whole crowd of people, I decided to split the cake mix in half. So, a dozen cupcakes were baked according to the directions on the back of the box. It was easy, and it meant that I could devote more time to the icing on these.

The idea for decorating these cupcakes came from my trusty Martha Stewart Cupcakes book. I flipped to the page for Easter cupcakes and I found these. It seemed pretty do-able. Just put together some royal icing (the really simple powdered sugar/meringue powder/water combo that produces a thick, almost glue-like icing that hardens once it's dry) and color it several different pastel shades. Then, using some piping bags and toothpicks, make pretty designs! I dove right in.


They aren't perfect, but I was pretty proud of how they turned out. They do look close to the ones in the book, I think! I let them dry, covered them with an airtight lid, and ran off to take care of some other things. Hours later, I came back and looked in on them. To my horror, the icing had become all liquid-y again and had started to run! I was baffled as to how this could have happened. I took the lid back off the cupcakes and after a few hours, they hardened right back up again. It was annoying, though, because it meant that the only way I could keep these intact was to leave them exposed to the air at all times. Fortunately, they tasted fine when they were finally served, and the designs hadn't run too, too badly.

I couldn't figure out what I had done wrong or why this had happened. I followed the directions for making the icing precisely, and had also adhered to the instructions for proper storage. A quick internet search seemed to indicate that maybe I had inadvertently allowed some grease to come into contact with the icing. Any grease or oil can ruin the whole batch. It's remotely possible that the mixing bowl of my stand mixer contained some residual greasiness. More than likely, though, the reusable piping bags I had used were the culprit. It seems like no matter what I do, those things never become completely grease-free, and usually I let it go because all I ever use them for is, well, frostings that contain some type of grease or other. But now I've learned my lesson. You live, you learn, right?


The peppermint cupcakes were easier. I added some peppermint extract and some peppermint powder (made by finely grinding some peppermints in my food processor) to the cake batter, baked the cupcakes, then made a simple buttercream frosting with some reserved peppermint powder folded in. It was easy, and I thought it tasted really good. It was definitely very minty, but not overpowering. The recipe for the peppermint cupcakes can be found here.
Hope you had a great Easter!


Thursday, April 1, 2010

CEIMB: Miso-Glazed Cod


So let me just start off by saying that I really did want to give this dish a chance. Really. I am by no means a fish eater. I do eat shrimp, but that is about as exotic as it gets as far as seafood on my plate. When this recipe for Miso-Glazed Cod came up this week in the rotation for Craving Ellie in My Belly, I was skeptical but optimistic. This recipe, chosen by Veggies and Valentino, seemed simple and straightforward, so I thought it would be a good way to try cod for the first time. Yes, you read right, Mom. I did try cod for the first time. But did I like it?

Well....I wanted to like it! I wanted to, so much. I just couldn't, though. We all tried it. My two little boys tried it; Evan threw it on the floor, and Xander declared that it tasted like fishy chicken. The real shocker was that Andy didn't even like it. I mean, he'll eat just about anything, and he did eat quite a bit of it, but he didn't actually enjoy it. He said, for one thing, that the glaze was overwhelmingly sweet. It was a simple glaze, made of miso paste, dark brown sugar, mirin, and sesame oil. I didn't think it was ridiculously sweet, but Andy swore it was almost sickening. I think the problem, when it comes right down to it, was in the preparation.


You see, Andy and I were both in the kitchen when this was being prepared, and we were both doing bits and pieces to get dinner ready. I forgot to tell him to pat the cod dry before applying the glaze. He didn't think to dry it, so the glaze was applied while the cod was not only slightly soggy, but it even had some ice particles still on it from the packaging. Oops. As a result, the glaze didn't caramelize or darken and the fish was falling apart when it came out of the oven. It was just too damp. I'd like to say it would be better if I'd followed the directions more completely, but I don't know if I'm brave enough to attempt this one again. For the cost of the big bag of miso I had to buy for this, plus the cost of the fish, it just wasn't worth it to us. Sorry, Ellie. This is the first time I've ever made one of your recipes and just couldn't like it.

I served this with Trader Joe's Vegetable Egg Rolls (yum!), and the side dish pictured in the cookbook alongside the cod. Sesame Stir-Fried Chinese Greens, made simply by quickly frying either bok choy or napa cabbage with rice vinegar, soy sauce, and sesame oil, didn't knock me out either. I mean, it was an okay side dish, but in the future I would probably mix it with some other types of stir-fry veggies, plus rice or udon noodles or something else. I'm glad I tried this meal, though. I can check off yet another item from my "to-try" list! Thanks to Veggies and Valentino for this week's pick!


Tuesday, March 30, 2010

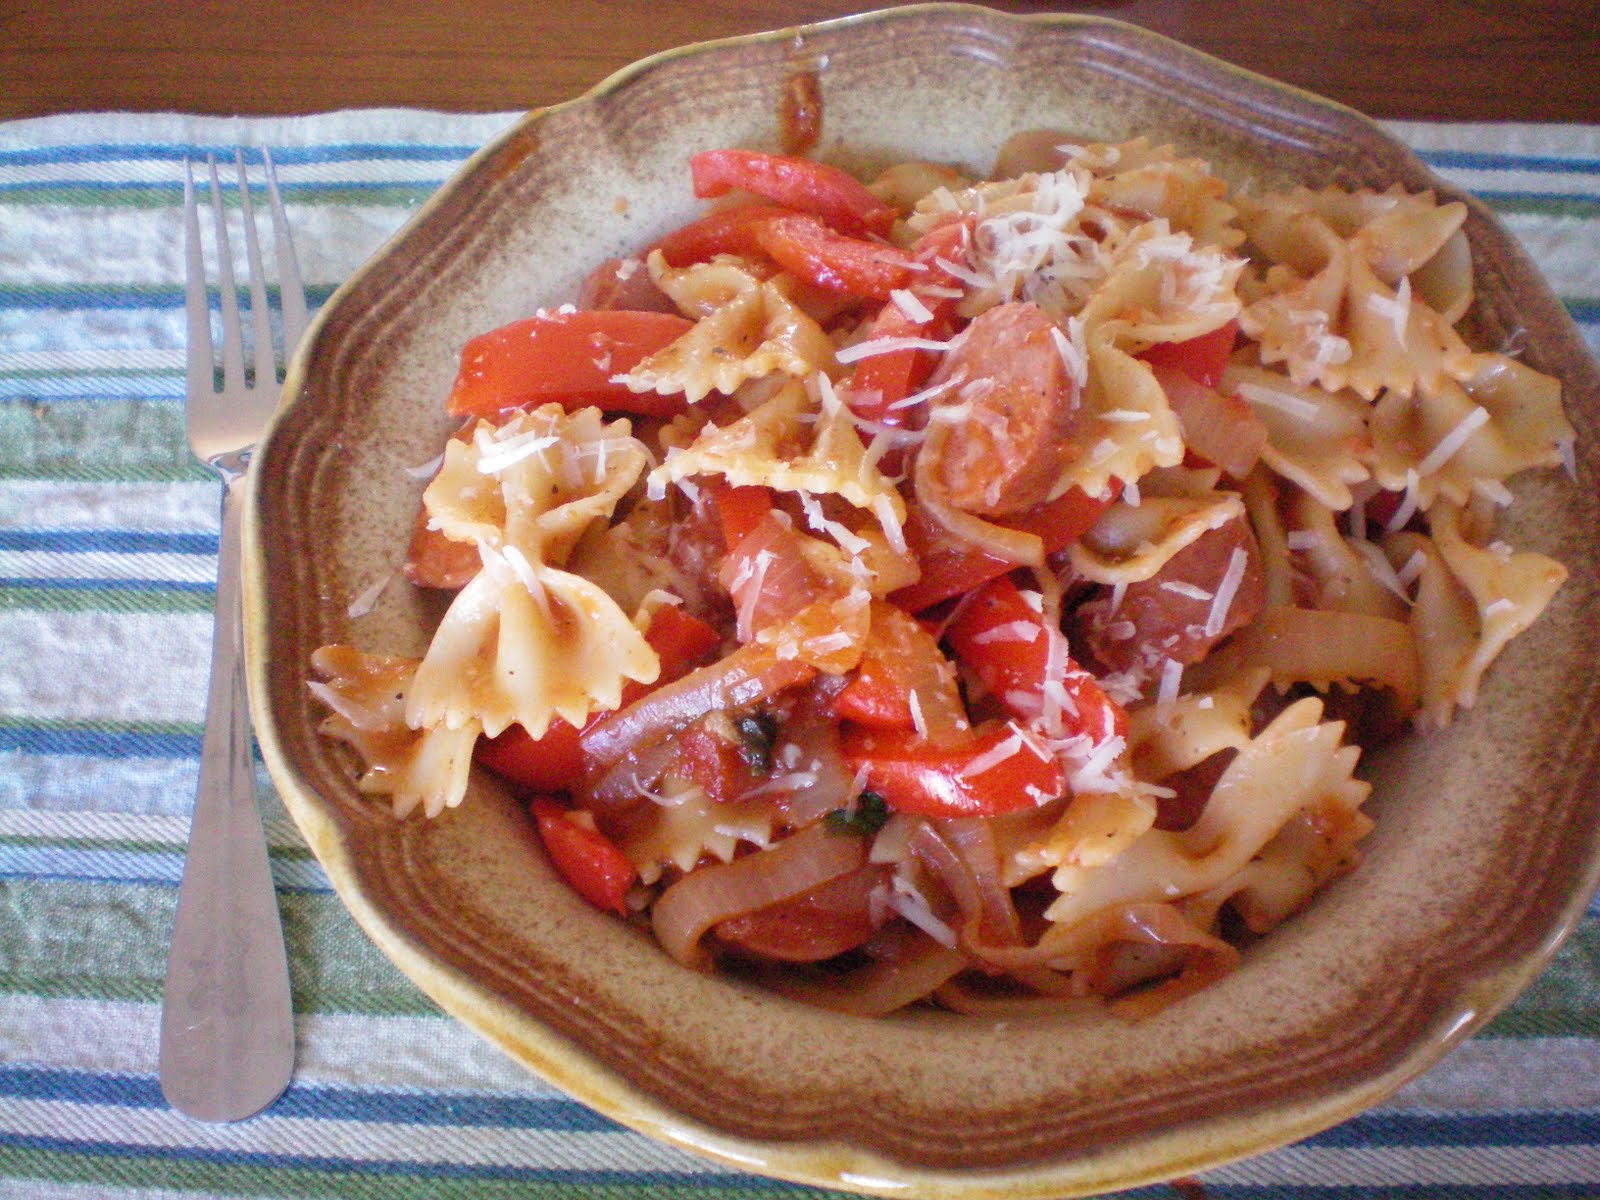
Farfalle with Turkey Sausage, Peppers, and Onions


This past weekend we attended the annual Easter Egg-citement at Eckert's Farm, just as we have the past two years. There were a couple differences this time, however. For one thing, it was freezing! Normally by the end of March, it's not too painful, but this past weekend it was in the 30s. I don't think it would have been quite so bad, had it not been for the wind. It was brutal! It didn't matter to the kids, though; they still had a blast. The other difference this year was that Evan is finally old enough to participate in the egg hunt! He had a lot of fun, not only with the hunt but also just running around and taking in the sights. He's definitely an outdoorsy baby! Just look at how happy he is outside on our deck.


Now, onto last night's dinner. This is one of the few recipes that I make repeatedly; most of the time I enjoy trying new ones. But this meal, from Giada De Laurentiis' cookbook Everyday Pasta, is worth making at least every couple of months. It's relatively simple to prepare, requires mostly inexpensive ingredients, and it's fabulous the next day as leftovers. Plus, it makes the house smell heavenly while it's simmering away on the stove!


Last night was the first time I actually made it with the Marsala wine that the recipe calls for. I have to say, it really did make a difference to me. Previously I had simply used chicken broth to deglaze the pan after cooking the veggies, but I thought I'd go all out this time and splurge on the bottle of Marsala. After all, it will give me an excuse to use it in other dishes. In this meal, the wine added a deeper, almost fruity flavor, and it blended surprisingly well with the tartness of the tomato paste. I recommend letting the sauce/sausage mixture simmer for at least the suggested 20 minutes, if not a half hour or more. This meal definitely benefits from a longer stay on the stovetop before hitting your plate.


Farfalle with Turkey Sausage, Peppers, and Onions
adapted from Giada De Laurentiis
serves 4-6

Ingredients
2 Tbsp. extra-virgin olive oil, divided
1 lb. sweet Italian turkey sausages
2 red bell peppers, cored, seeded, sliced
2 yellow onions, sliced
1 tsp. salt
1 tsp. freshly ground black pepper
4 garlic cloves, chopped
1/2 tsp. dried oregano
1/2 cup fresh basil, chopped
2 Tbsp. tomato paste
1 cup Marsala wine
1 14-oz. can diced tomatoes, with juice (I pureed mine a bit)
1/4 tsp. crushed red pepper flakes (optional, but we added it in)
1 lb. farfalle pasta (Giada's recipe calls for rigatoni)
freshly grated Parmesan cheese, for garnish

Directions
1. Heat 1 Tbsp. oil in a large, heavy skillet over medium heat. Add the sausages and cook until brown on all sides, 7 to 10 minutes. Remove sausages from the pan.
2. Keeping the pan over medium heat, add the other 1 Tbsp. oil. Add bell peppers, onion, salt, and pepper and cook until golden, 5 minutes. Add the garlic, oregano, and basil and cook for 2 minutes. Add the tomato paste and stir until incorporated, then add the Marsala wine. Allow the wine to cook out a bit, scraping the bottom of the pan with a spoon to release the brown bits. After a minute or so, add the tomatoes with their juide, and the (optional) red pepper flakes. Stir to combine, then bring to a simmer.
3. Cut the sausages into 6-8 slices each, then return them to the pan. Simmer, uncovered, until the sauce has thickened, at least 20 minutes (30-40 would be even better).
4. While the sauce simmers, bring a large pot of salted water to a boil over high heat. Add the farfalle and cook according to the package directions. Drain pasta and add to the thickened sauce; toss to combine. Spoon into shallow bowls and sprinkle servings with Parmesan cheese.


Sunday, March 28, 2010

Country Captain Chicken

Bobby Flay's Food Network show, Throwdown with Bobby Flay, is one of those shows that just sucks me in, no matter what I am doing at the moment. I get totally wrapped up in the competition of it. In the show, Bobby Flay "surprises" a cook or cooks that are well-known for cooking one particular thing very well. He shows up at an event where the cooks are going to be demonstrating how to make their signature dish, and challenges them to a head-to-head cook-off. Two impartial judges come in at the end and determine which dish reigns supreme. Usually, Bobby loses, and that's kind of the point. He prefers to showcase other peoples' legendary cuisine, rather than toot his own horn.

I happened to catch an episode a few weeks back where he challenged the Lee brothers, two chefs based out of Charleston, to a Country Captain Chicken throwdown. I had never heard of this dish, but I was instantly intrigued. After rendering some bacon or pork fat in a Dutch oven or pot, you brown some chicken thighs, then saute some vegetables and simmer them in a tomato-based sauce that contains a healthy dose of curry powder, as well as a couple other surprising ingredients (raisins, anyone?). You simmer the sauce, thicken it up, then serve the whole concoction with rice. Garnish with parsley, slivered almonds, and the bacon that was previously reserved, and you've got an incredible taste combination that literally sets off explosions of flavors in your mouth. It's unbelievable.

When I looked up this dish online (like, immediately after the show ended, because it seriously just looked that good), I read through both the Lee boys' and Bobby's recipes. Even though his version lost on the show, I decided I was going to try Bobby's, just because I thought my family would like his spin on it a little bit more. The Lee brothers' version looked awesome too, though, and I'm sure I'll be trying that one too someday!

It turns out that this takes quite a while to make, but I was confident that it would be worth it. The hardest part is waiting while it bubbles away on the stove,


and then waiting again when it is transferred to the oven to reduce further. The smell is just amazing. And even though these flavors may sound like they wouldn't work together, they totally do. They work so well, in fact, that I can't wait to make this again! It's the kind of dish you remember, long after the final dish is cleaned and put away.


I'm posting the recipe the way I did it, because I changed things just a bit from the original recipe. The exact version of Bobby's dish is found here. He makes his own spice blend for the curry powder, while I just used the hot curry powder from Penzey's. Their curry powder is delicious, by the way. In addition, he made a coconut rice to go alongside, while I just opted for the plain kind. Finally, I cut his recipe in half, since I was just feeding myself and the boys. Here's what I did:

Country Captain Chicken
adapted from Bobby Flay
serves 2-3

Ingredients
1 cup white rice
2 cups water
2 green onions, thinly sliced
3 slices bacon, diced
1/2 Tbsp. canola oil
1 Tbsp. butter
3/4 cup all-purpose flour
salt and freshly ground black pepper
4-5 bone-in chicken thighs, skin removed
1 small red onion, chopped
1/2 a green bell pepper, chopped
1/2 a red bell pepper, chopped
1 small red jalapeno pepper, finely chopped
2 cloves garlic, thinly sliced
3/4 tsp. curry powder
1/4 tsp. ancho chili powder
1/2 cup dry white wine
1 cup chicken broth or stock
1 14 oz. can crushed tomatoes (diced is fine, too)
2 Tbsp. raisins or currants
1/2 tsp. dried thyme
honey
1/4 cup coarsely chopped freshly parsley
slivered almonds, lightly toasted and chopped

Directions
1. Preheat oven to 325 degrees. Place a Dutch oven or high-sided saute pan over medium-high heat. Add bacon and cook until brown and crisp. Remove to a towel-lined plate and reserve. To the rendered bacon fat in the pan, add the oil and butter; heat until it begins to shimmer.
2. Place flour in a shallow bowl or pie plate and season liberally with salt and pepper. Season chicken on both sides with salt and pepper, dredge each thigh in flour, then shake off the excess. Sear chicken on both sides until golden brown, then remove to a plate.
3. Add onion and bell pepper to the pan, season with salt and pepper, and cook until soft, about 5 minutes. Add the garlic and the red jalapeno and cook for 1 minute. Stir in the curry and ancho chili powders, and cook for another minute. Add the wine and cook until reduced by 3/4. Add the chicken broth, bring to a simmer, and reduce slightly. Stir in the tomatoes, raisins or currants, thyme, 1 teaspoon honey, and salt and pepper, and bring to a simmer. Nestle the chicken thighs into the pan, cover with a tight-fitting lid, and transfer into the oven to bake for 35 minutes.
4. Remove the lid after 35 minutes and continue to bake for 15 minutes. After removing the lid, start the rice in a different pot. Bring the 2 cups water to a boil, add the 1 cup rice, return to a boil. Turn the heat down to low, cover, and simmer for 18-20 minutes, until the liquid has been absorbed by the rice. Turn off heat, add green onions, fluff with a fork, and let stand for 5 minutes more.
5. After baking without the lid for the additional 15 minutes, remove the chicken mixture from the oven. Place it back on the burner over high heat and let it come to a boil. Allow mixture to reduce slightly (I just did so until I liked the consistency, about 5 minutes), then remove from heat. Add salt, pepper, and honey, to taste.
6. To serve: place rice in the bottom of a shallow bowl. Add 1 or 2 chicken thighs, then spoon the sauce mixture over the chicken. Garnish with reserved bacon, parsley, and slivered almonds.
Savor and enjoy!


Thursday, March 25, 2010

CEIMB: Marinated Chicken and Grape Skewers

For this week's Craving Ellie in My Belly pick, we made Marinated Chicken and Grape Skewers, found in Ellie Krieger's book, So Easy. It was chosen by Elina, over at Healthy and Sane. Up until now, I think I'd only made maybe one or two recipes from Ellie's newer book. But after making these skewers, I think I'll be digging into that book a lot more often now!

This couldn't be easier to make. Just take some cubed, boneless, skinless chicken breast, marinate it in a simple mixture of lemon juice and zest, olive oil, garlic, cumin, salt, and coriander, and pop it onto some skewers with some green grapes. The chicken can sit in the marinade for anywhere from 20 minutes to 4 hours. In the cookbook, this is paired with a garden lentil pilaf, although it wasn't necessary to make that alongside for the CEIMB group.

We didn't have lentils on hand, but we did have some Israeli couscous. If you've never tried it, I highly suggest you do. It's a larger grain than your average couscous, probably the size of a peppercorn. The method of cooking is similar to that of rice: bring it to a boil in a pot of water, turn down the heat to a simmer, and let it go for about 10 minutes. You can do so much with it, too. We discovered it about 2 years ago and have been hooked ever since. So I made the pilaf recipe listed in the cookbook, but I substituted the Israeli couscous for the lentils.


It turned out to be absolutely delicious. When served with the chicken skewers on top, the couscous absorbed the yummy juices and just paired up so well with the plump grapes and tender chicken. The skewers themselves were amazing. Andy was actually mmm-ing and ohh-ing his way through the meal, and he rarely ever gets that excited about food. Normally, I'm the one freaking out over food!


To top off the meal, I made a simple roasted green bean dish that was also very yummy. The beans are tossed with some olive oil, peeled garlic cloves, salt, and pepper. It couldn't be easier, and it's a nice change from the normal, everyday green bean side dish. All in all, this meal was one of the best we've had in a while. The only disappointment was that we couldn't grill the skewers, like the recipe recommends. It was raining all day when we made it. But we used our electric griddle, and it worked out just fine. Still delicious, but without grill marks. Thanks to Elina for choosing this recipe. It's going to become a staple in our house!


The recipe for the skewers can be found here.
The recipe for the green beans can be found here.

Here's my version of the pilaf:

Israeli Couscous Pilaf
adapted from Ellie Krieger's So Easy
serves 4

Ingredients
1 cup dry Israeli couscous
1 1/4 cups water
1 Tbsp. olive oil
1/2 red onion (Ellie used 2 Tbsp. shallots), diced
3 cups arugula (Ellie used baby spinach)
1 cup halved grape tomatoes
1/2 cup fresh basil leaves (Ellie used a combination of basil, parsley, and mint)
2 Tbsp. fresh lemon juice
1/2 tsp. salt
1/4 tsp. freshly ground black pepper

Directions
1. Place water in a pot, bring to a boil, and add couscous. Reduce heat, cover, and simmer for about 10 minutes, until couscous is done.
2. Meanwhile, heat olive oil in a skillet over medium-high heat. Add onion and cook, stirring until softened, about 3 minutes. Add the arugula and cook until just wilted, about 2 minutes.
3. Add the tomatoes, cooked couscous, and basil to the pan and stir to combine. Cook until warmed through, about 1 minute. Stir in the lemon juice, salt, and pepper, and serve.


Tuesday, March 23, 2010

Brown Soda Bread and Irish Stew

After trying my hand at Indian flatbreads, I decided it was time for me to graduate to something a little bit more complicated. I found a recipe for soda bread in the March issue of Cooking Light, and I thought it sounded like it may fit the bill. I had been really wanting to make something Irish for St. Patrick's Day this year. It's funny; I've got a lot of Irish in my blood, but up until a week ago I had never made any type of Irish cuisine. I set out to change that.

To my slight disappointment, though, I realized when I actually read through the soda bread recipe that it was going to be easy to make! I was bummed. I had been looking to do something that would challenge me a little more than the flatbread had, but this was not it. My disappointment didn't last very long, though. I was still getting to bake bread, which was going to be fun, no matter what. It turns out that this bread is a quick bread. It contains all kinds of nice, healthy ingredients, such as whole wheat flour, wheat bran, and steel-cut oats. The oats in particular are something I've had on hand for a while but haven't been able to use yet. Now was my chance!


After a quick mix of ingredients, a transfer into a loaf pan, and a trip to the oven to bake for 65 minutes, it was all done. It smelled wonderful, and it tasted even better. The kids and I were snacking on it while I made dinner that night, and it was pretty addictive. Now that I've finally made a quick bread, I want to do it again sometime soon. It's such little effort, for such great reward. I could get used to having homemade bread around all the time.


The main dish that evening was Pork and Guinness Stew. I know, another recipe using beer. I've really been stepping outside my comfort zone lately. Ordinarily this wouldn't be something I'd make, but when I read through the recipe it just sounded yummy to me, and a good way to dip my toe into the world of Irish cuisine. I substituted pork for the beef in the original dish, and threw in a sweet potato while omitting a parsnip (we just don't like them around here). The result was a very delicious, very hearty meal that was well worth the length of time it took to bubble away on the stove. I have to say, we've been very happy with our monthly Cooking Light magazines; nearly everything we cook from them truly make us forget we are eating so healthy!


The recipe for the Brown Soda Bread can be found here.
The recipe for the Beef (or in our case, pork) and Guinness Stew can be found here.


Sunday, March 21, 2010

Boozy Brownies

When trying to decide what kind of special treat to make for St. Patrick's Day, I turned to the March issue of Cooking Light Magazine for inspiration. They had a full menu for St. Patty's, from starters to after-dinner coffee, and I thought much of it sounded great and worth trying. However, these brownies really caught my eye. They're called Black and Tan Brownies, and they are basically two-layer bars with beer as one of the ingredients. Initially I was surprised to see a recipe like this in Cooking Light. Beer? Real butter? Pure unsweetened chocolate? All baked into a brownie? How could that be healthy? But hey, I figured if Cooking Light was telling me I could eat this, guilt-free, who was I to argue?

I really wasn't sure how this was going to go. I mean, it could either have been an ambitious kitchen experiment gone terribly wrong, or it could be my next great discovery. Only time (and my trusty taste-testing husband) would tell. So I dove in. The first step was very simple and came together quickly. I whipped together a blondie layer (the "Tan" part of the brownie) and baked it in the oven for 15 minutes.


When that part came out of the oven, I was instructed to assemble the brownie layer, or the "Black" half of the brownie. This is the part that contained beer. A whole cup of it. The recipe recommended I use Guinness Stout, but we had purchased a double chocolate stout just for this occasion.

When the finished product came out of the oven, I discovered that the blondie layer had risen too much on the sides and not as much in the center. As a result, the whole entire pan of brownies had a funny-looking border of blondie around its edges, making it look kind of like a brownie picture in a yummy frame.


This was simple enough to fix. Once it was entirely cool, I carefully sawed off the edges of the brownie and cut about 24 squares. I now had 2 dozen cute little black and tan brownies, and four long, skinny borders to taste test! And taste test I did. These are really good brownies. The beer does pair well with the chocolate, and it's not overwhelming or overpowering. I am not a fan of the taste of beer, so I didn't know whether I'd like these. But the flavors are complementary and make for an intriguing, delicious adult treat. It's a good thing my children are not brownie fans, or else this probably wouldn't be the best brownie to make and keep around the house. They were great for Andy to take to work, though! He loved them, and they were devoured quickly at his office.


Black and Tan Brownies
adapted from Cooking Light, March 2010
makes 24-36 bars, depending how big you cut them


Ingredients
Tan Layer
6 tablespoons butter, softened
1 1/2 cups packed brown sugar
2 large eggs
1 teaspoon vanilla extract
4.5 ounces all-purpose flour (about 1 cup)
1 teaspoon baking powder
1/4 teaspoon salt
1/2 cup chopped pecans (I omitted)
Cooking spray

Black Layer
3 ounces unsweetened chocolate, finely chopped
4 tablespoons butter
1 cup granulated sugar
2 large eggs
1 teaspoon vanilla extract
1 cup Guinness Stout (I used different beer; it was fine)
4.5 ounces all-purpose flour (about 1 cup)
1/4 teaspoon salt

Directions
1. Place one rack in lower third of oven; place another rack in center of oven. Preheat oven to 350 degrees.
2. To prepare Tan Brownies, place 6 Tbsp. butter and brown sugar in a medium bowl; beat with a mixer at medium speed until light and fluffy. Beat in 2 eggs and 1 tsp. vanilla. Weigh or lightly spoon 4.5 oz. flour into a dry measuring cup; level with a knife. Combine this flour, baking powder, and salt, and stir well. Add flour mixture and pecans, if using, to sugar mixture, beating just until combined. Spoon into a 13x9-inch baking pan coated with cooking spray, spreading evenly with a knife or rubber spatula. Bake at 350 in lower third of oven for 15 minutes.
3. To prepare Black Brownies, melt chocolate and 4 Tbsp. butter in a large microwave-safe bowl on HIGH for 1 minute or until melted, stirring after every 20 seconds until smooth. Add granulated sugar, stirring until well combined. Add 2 eggs, 1 tsp. vanilla, and beer, stirring with a whisk until well combined. Weigh or lightly spoon 4.5 oz. flour into a dry measuring cup; level with a knife. Combine this flour with the salt, stirring well. Add flour mixture to chocolate mixture, stirring to combine. Pour mixture evenly over Tan Brownie layer.
4. Bake on the center rack at 350 for 25 minutes, or until a wooden pick inserted into center comes out almost clean. Cool in pan on a wire rack; cut into squares.
*Note: I lined my pan with aluminum foil, then sprayed foil with cooking spray. This worked well; the foil peeled off easily when brownies were inverted onto a flat surface.